Tulip tutorial by Jo Orr - Ciccio Cakes

How to make a large beautiful tulip sugar flower
You will need
- Foam board
- Rolling pin
- Ball tool
- Dresden tool
- Gumpaste (small amount of white and whatever colour you want the base of your tulip to be)
- Edible glue (just a bit of tylose dissolved into water)
- 26 gauge wire & 1 20 gauge wire (both wrapped)
- Veiner (this one is from Way Beyond Cakes by Mayen
- Tulip petal cutter(this one is a large one from Sugar Delites)


Making the center - The Pistil
- Make a small hook on your 20 gauge wire and dip it in a little edible glue, wiping off the excess on the back of your hand.
- Take a large pea sized piece of white sugar paste and insert the hooked end of the wire into the base of the gumpaste ball and roll base between your fingers to form this shape.
- Using the Dresden tool impress three dents into the top
- Allow to dry overnight. Hang them as shown, or stick into Styrofoam. (Follow the next photo series as the stamen need to dry overnight as well.)
- Using green petal dust mixed with high-proof alcohol, paint it green.
- Dip into pollen powder. I used one made by Sugarflair, but you could use very fine semolina.
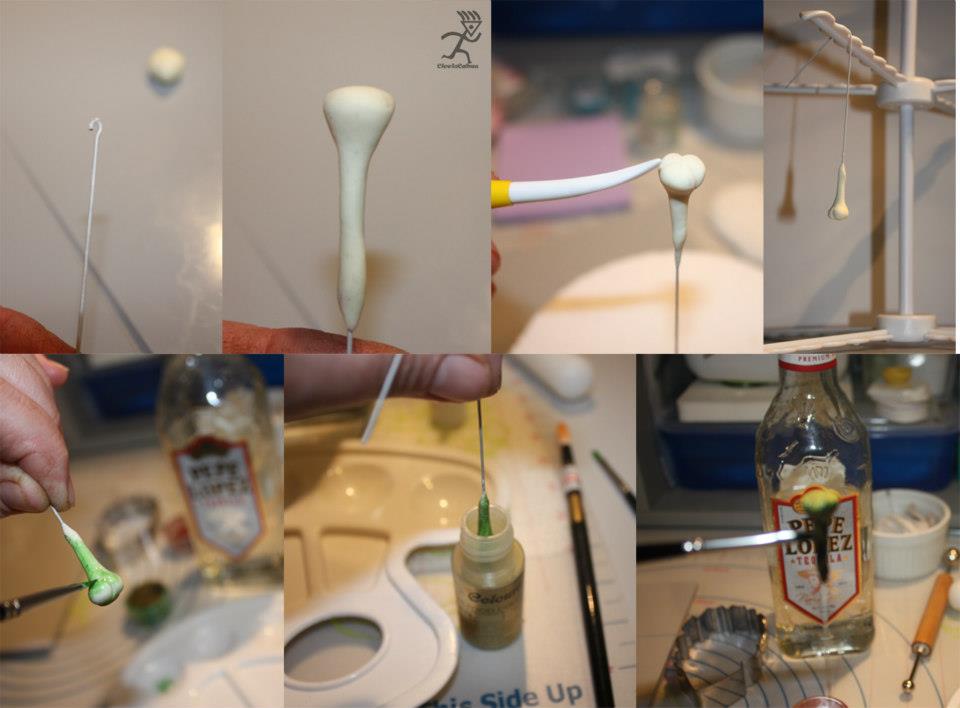
I like to paint the base with the same colour that I use on the stamens, but you can leave it plain green. It's personal choice.
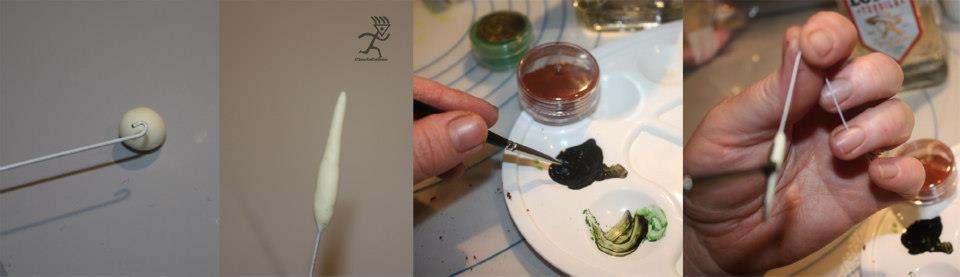
Making the center - The stamens
- You will need six stamens per tulip. For the stamens I use 26 gauge wire with a small hook. Dip the wire into a little edible glue and wipe off the excess on the back of your hand.
- Take a half pea-sized piece of white gumpaste and roll it into a thin sausage tapered to a point as shown. Allow to dry overnight
- Paint with a small amount of caramel or brown dust mixed into high proof alcohol or decorators spirit.
- Paint the whole stamen and allow to dry
Assemble the centres
- Tape the 6 stamens around the pistil with floral tape and put aside.

Great hack for wiring petals
- Roll out your gumpaste thinly so you can see the indent of the cell board
- Dip your 26 gauge wire into some edible glue, wipe excess off on your hand
- Place over the bit where you can see the indent, press lightly, then fold over your gumpaste
- Re-roll thinly so you can see the indent through the paste again. This is so much easier than threading wire through petals.
- Place the cutter over the wire, making sure it is centered. Press down on all the edges, then I hold the cutter and lift the excess paste away, then carefully lift the petal and you will see the wire is perfectly in the center as shown below.


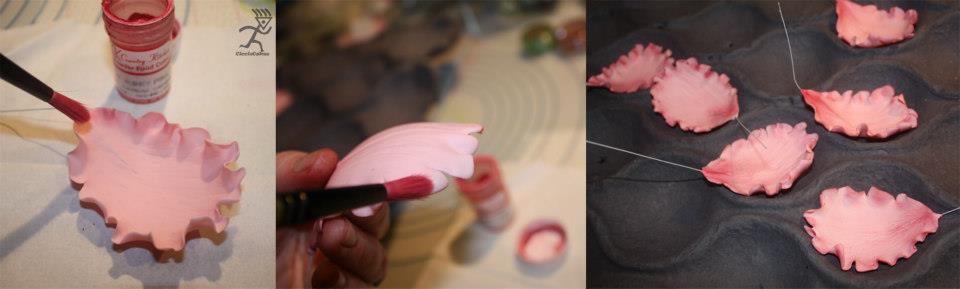
Finishing the petals
- Using my veiner (courtesy of Way Beyond Cakes by Mayen) I use the veiner by placing each petal on a foam base and pressing down. I repeat this on both sides
- I use a apple tray as a former to dry as you want the top of the petals to curve over a little. Push random areas of the petals inwards to give them movement.
One tip: I press the inside of the petal first you will lose some of the imprinted details when you repeat veining for the outside. If you want the veins to be more pronounced on the outside, allow your petals to dry overnight for at least two days before dusting as they will be stronger.

Dusting the petals
This colour I have dusted with cherry pink dust paying extra care to dust the edges and base of each petal well on both sides.
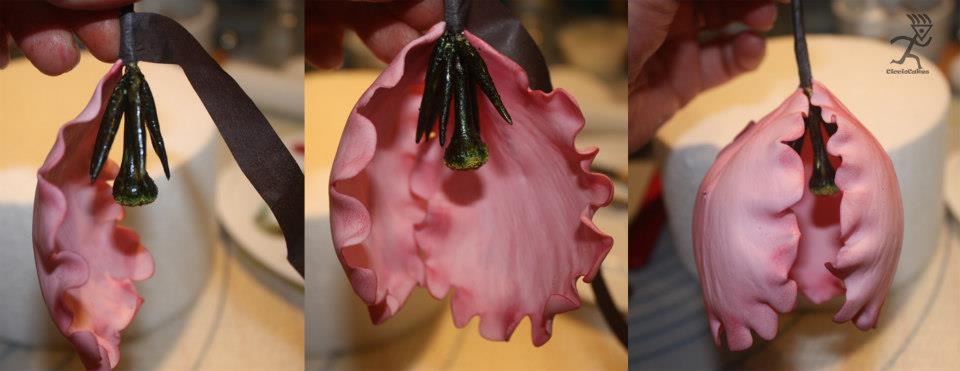
Assembling the tulips
1. Wrap each petal individually around the center, but tape the first three petals around, then tape the second three so that the centers of the new petal covers the gap between the first set of petals. I would usually tape these with a paler green tape but I had run out so this would have to do :-)

.
Want to see more tutorials?


Jo Orr has been a working pastry chef for the last 20 years and runs Rotorua-based Ciccio Cakes. She is an encyclopedia of knowledge for all things cake. If you haven’t had the chance to try one of her famous cake slices from the Ciccio’s cake cabinet, be sure to put it at the top of your foodie to-do list.
You can find Jo on Facebook and Instagram.
![]()