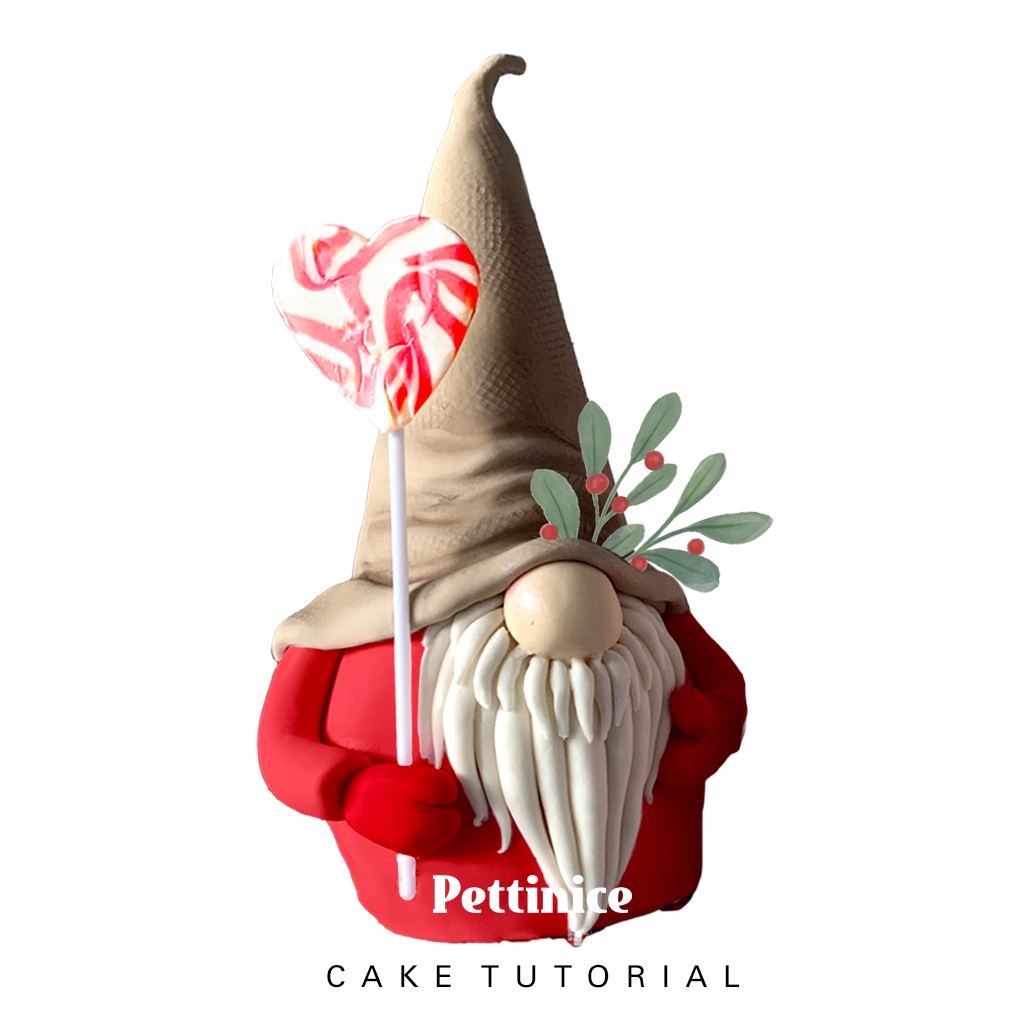
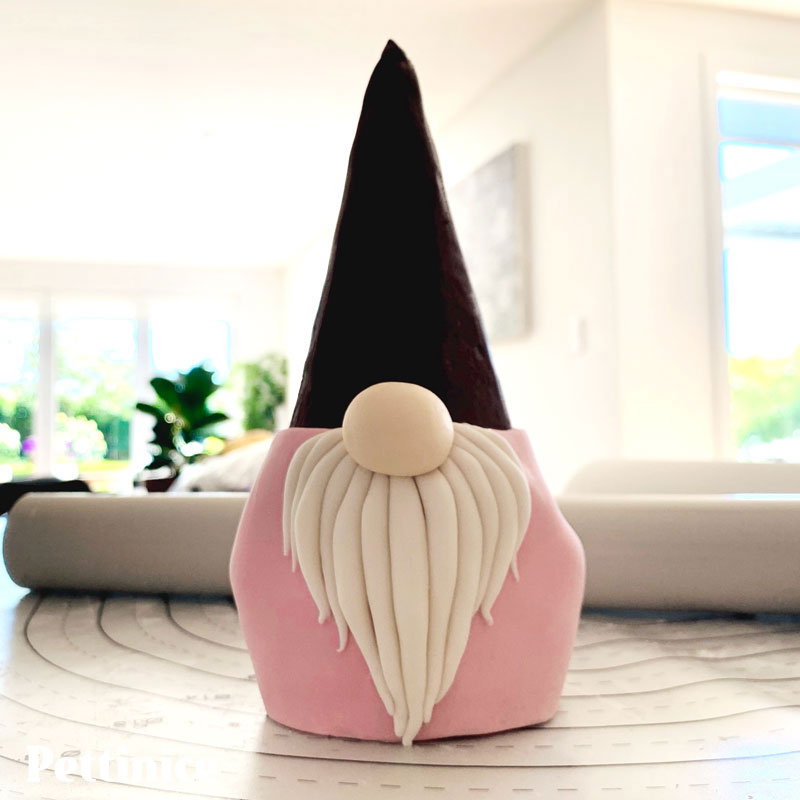
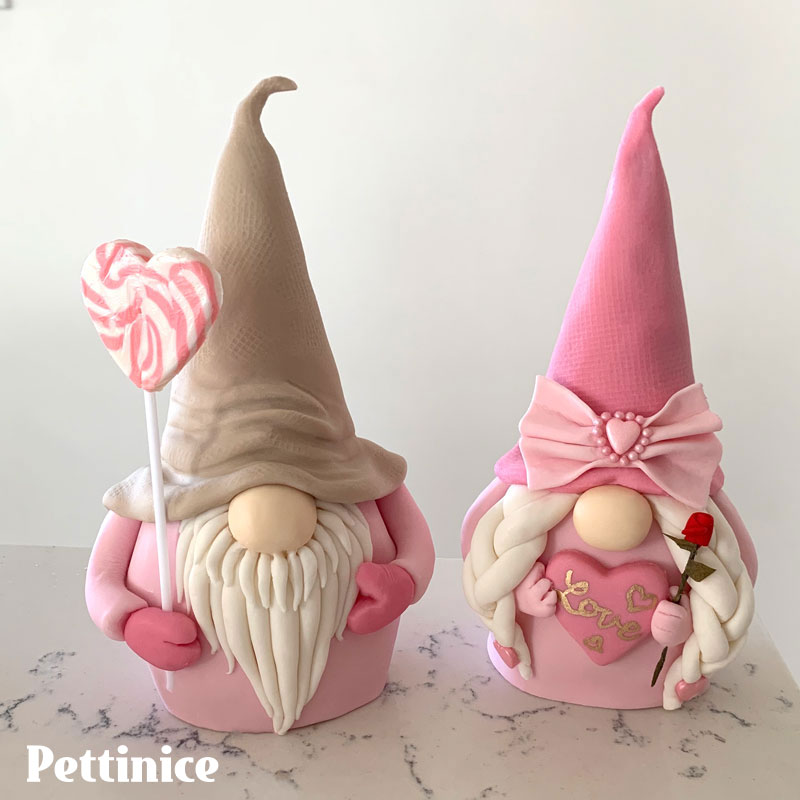
How to make a fondant Gnome topper
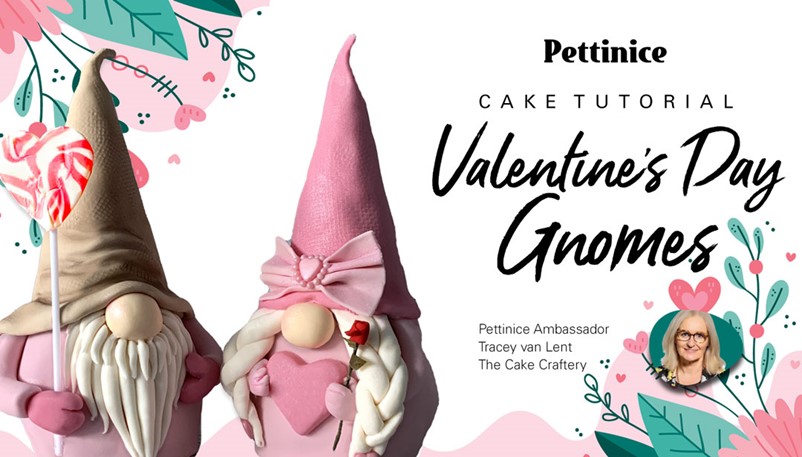
These basic gnomes can be adapted to suit any occasion by changing their clothing colours and accessories. Follow my cute tutorial using Pettinice to create your very own Valentine's Day Gnomes!
These loveable muffin-sized gnomes are modelled on those found in rich Scandinavian folklore. Some believe they protect homesteads and farms and can sometimes be mischievous - but never malicious!
They have a minimalist aesthetic compared to British garden gnomes and are often represented by just a body, a beard, a nose and a hat, often in muted rustic tones or red.

Edibles needed:
- Cupcakes baked in large muffin pans (1 per gnome)
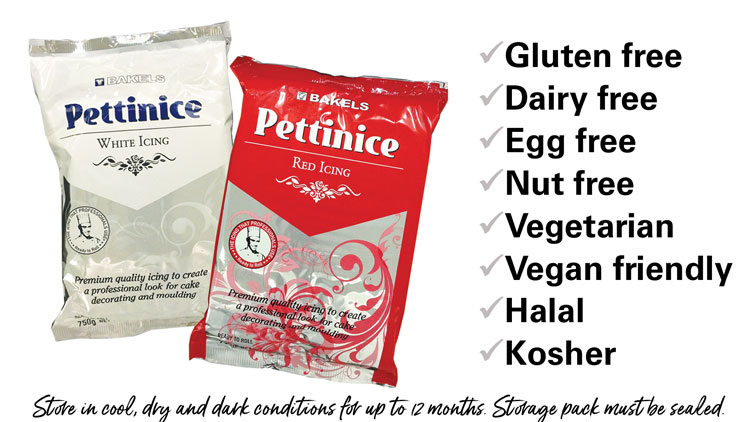
- White Pettinice 360g
- Red (or Pink for Valentines) Pettinice 180g
- Brown Pettinice
- 10g Ivory or peach gel colour for nose
- Pinch of tylose powder (optional)
- Large ice cream cone (1 per gnome)
- Chocolate ganache or Bakers Truffle.
- Gold edible paint or dust + rose spirit
- Tylose glue or water
- A little sieved apricot jam thinned with water to piping gel consistency
Tools and non-edibles needed:
- Rolling pin
- Small spatula
- Dresden tool
- Flexi smoother (optional)
- 2-3cm heart cutter
- Glue brush (food safe)
- Fine paintbrush (food safe)
- Soft pastry brush for the jam
- 5 cm length of floral wire + green tape (or use spaghetti)
- Trimming blade
- Small cake card to fit base of cake
Optional:
- Small treats and sprinkles to fill cone
- Lollipop (1 per male gnome, optional)
- Pink and brown dusts and brush
- Texture mat of your choice
- 2g red Pettinice for rose or red dust to colour it
Whilst St. Valentine’s Day is not rooted in Scandinavian culture, what could make a cuter gift than these ‘his and hers’ gnome cakes that are truly in the pink! You can even add small treats inside their hats for someone really special. Make a whole batch of them to share with your loved ones!
You are probably familiar with Christmas gnomes but have you thought about a Birthday Gnome? Instead of holding a lollipop add a birthday candle and balloons. An Easter Gnome? Add bunny ears and tail. A patriotic gnome? Give them a flag to hold and dress them in matching colours
Prepare your cakes
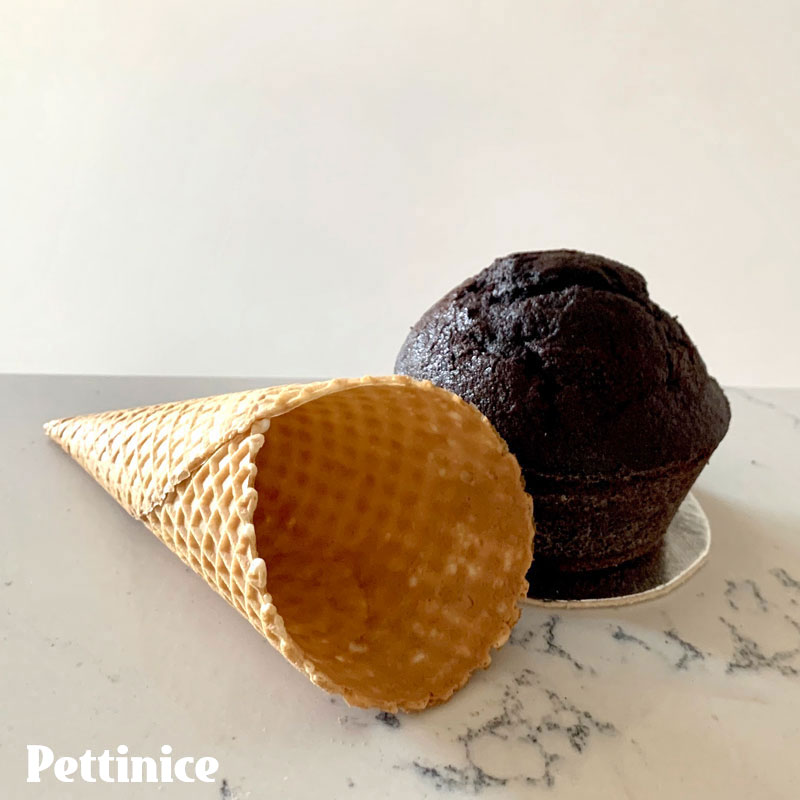
2. Large domed cupcakes are the best for this. I used well-greased muffin pans and filled them to about 1cm below the top. The muffin pans measure 9 cm at the opening/top. You can use smaller cupcakes and standard sized cones if you prefer.
3.When the cupcakes have cooled, attach to small cake card with ganache and chill in the fridge for 10 mins to firm up the butter in them. This makes them much easier to carve.
While cakes are cooling prepare your Pettinice colours as follows:
Mix 200 of the white with 50g of the pink to make the light pink. Wrap well.
Mix 100g of the white with 10g brown to make the light brown. Wrap well.
Wrap remaining white and pink Pettinice ready to use.
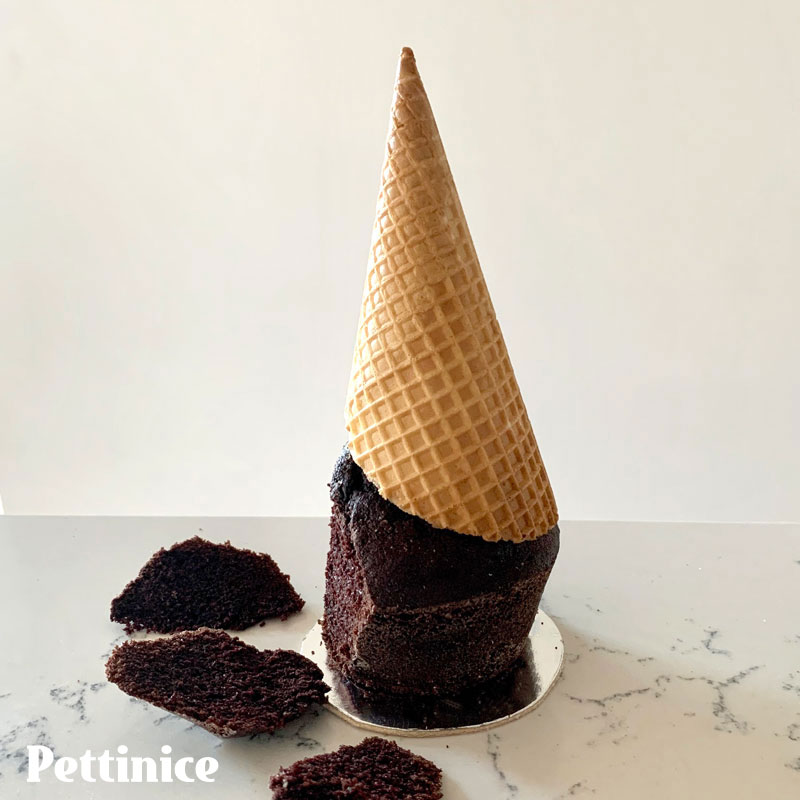
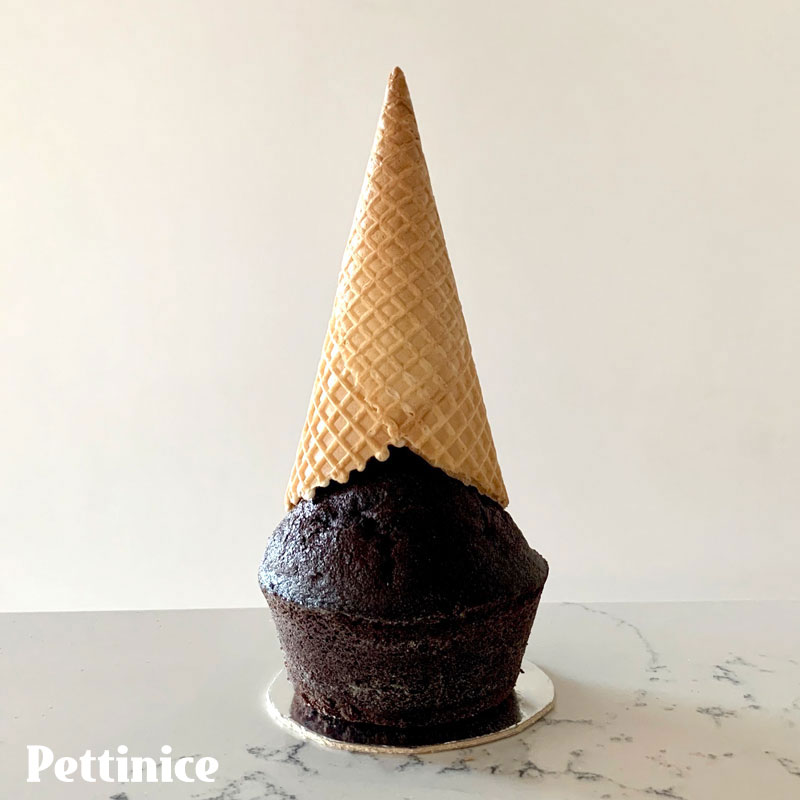
4. With the ice-cream cone on top of the cupcake as a guide, carve away a section at the front of the cake where the beard and nose will be.
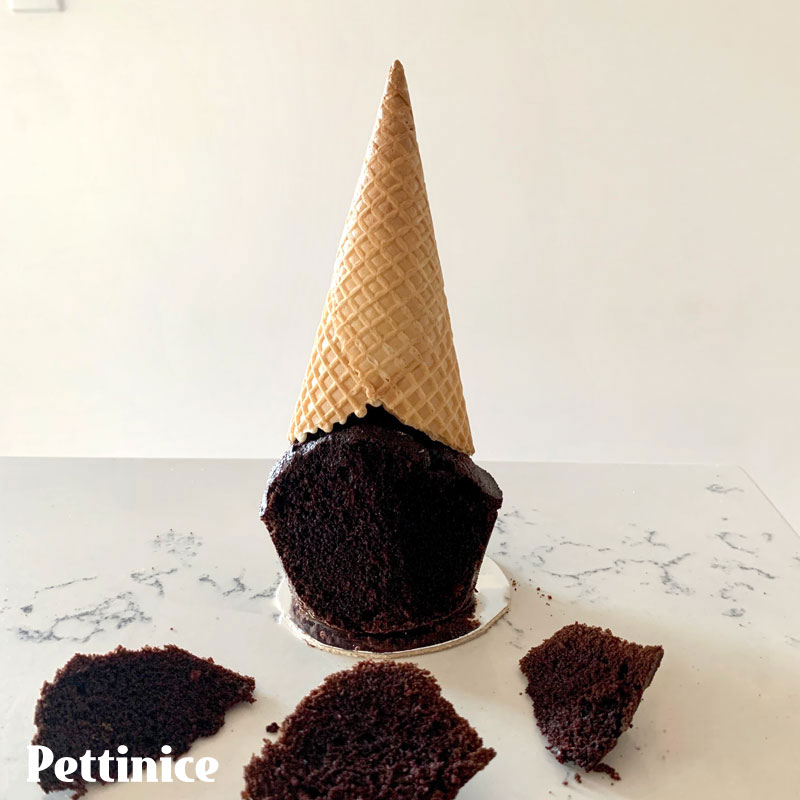
5. Carve straight down from the cone at the front and then round off a piece from each side of this cut, as shown. You can trim away the front of the cake card with strong scissors if desired.
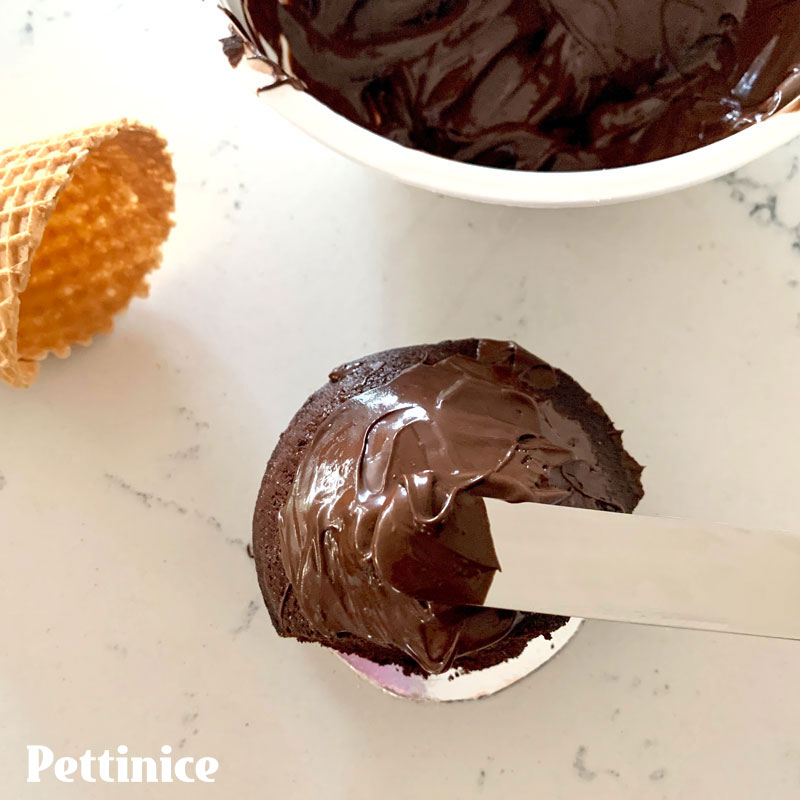
6. Cover the top of the cake with ganache or Bakels Chocolate truffle. At this point, place treats in the cone if using.
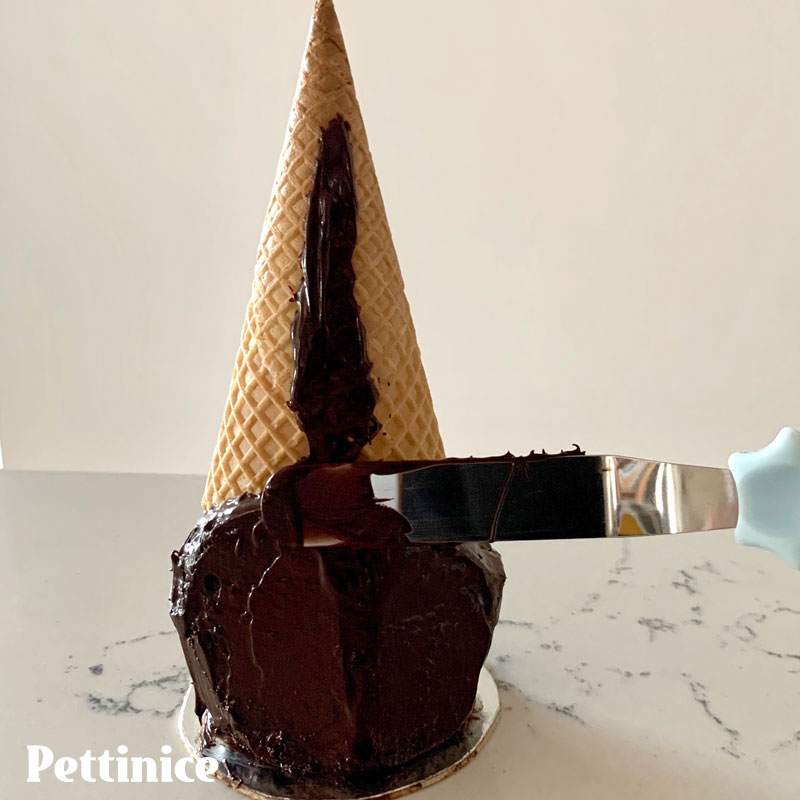
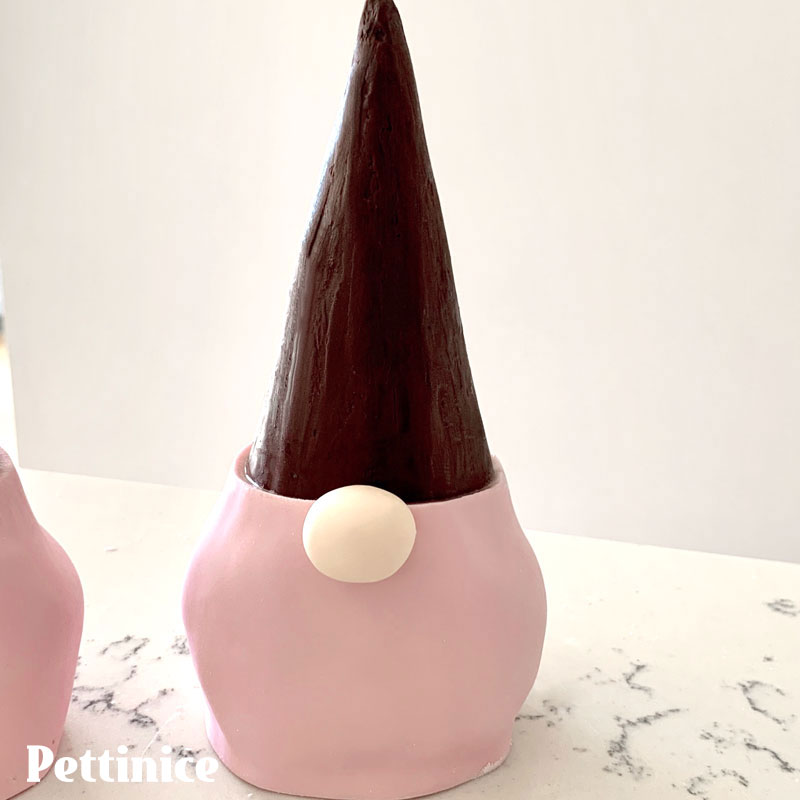
7. Place the cone down into the ganache and then coat the sides of the cake, as well as the entire cone, with ganache. If the cone has treats in it, it’s best to turn both the cake and the cone sideways towards each other until the top of the cake fits into the cone, so nothing falls out. Then stand it upright again.

8. Set the ganache-covered cake in the fridge for 10-15 minutes.
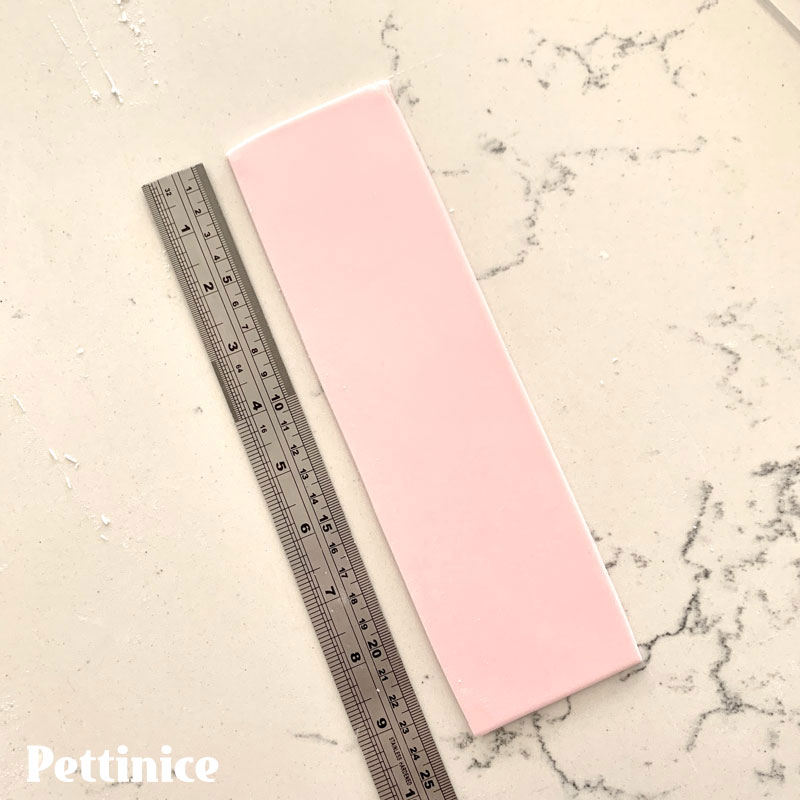
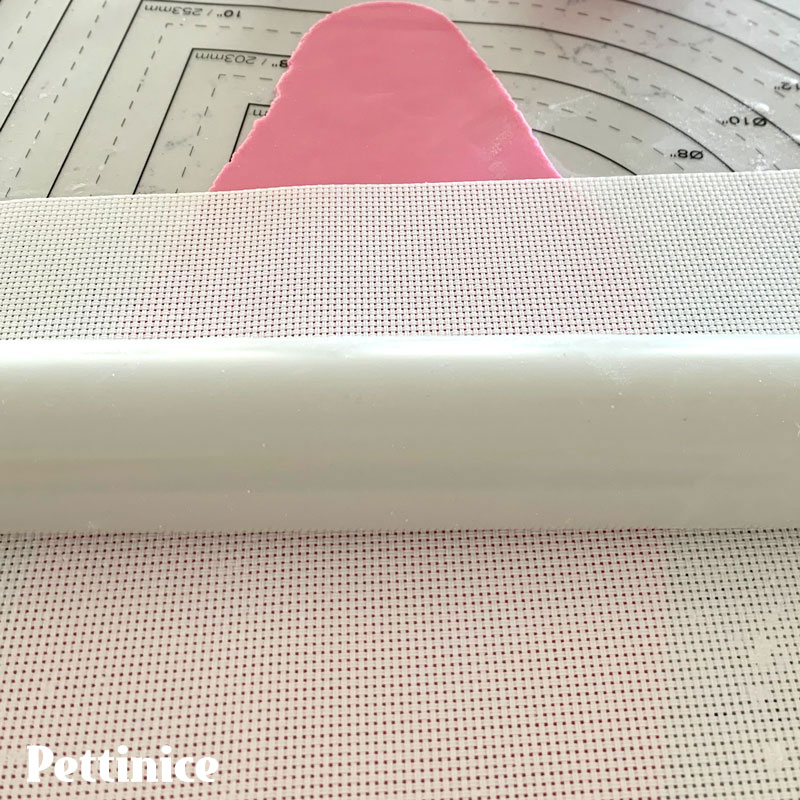
9. Roll and cut 2 pieces of the light pink Pettinice 24cm x 8cm each.
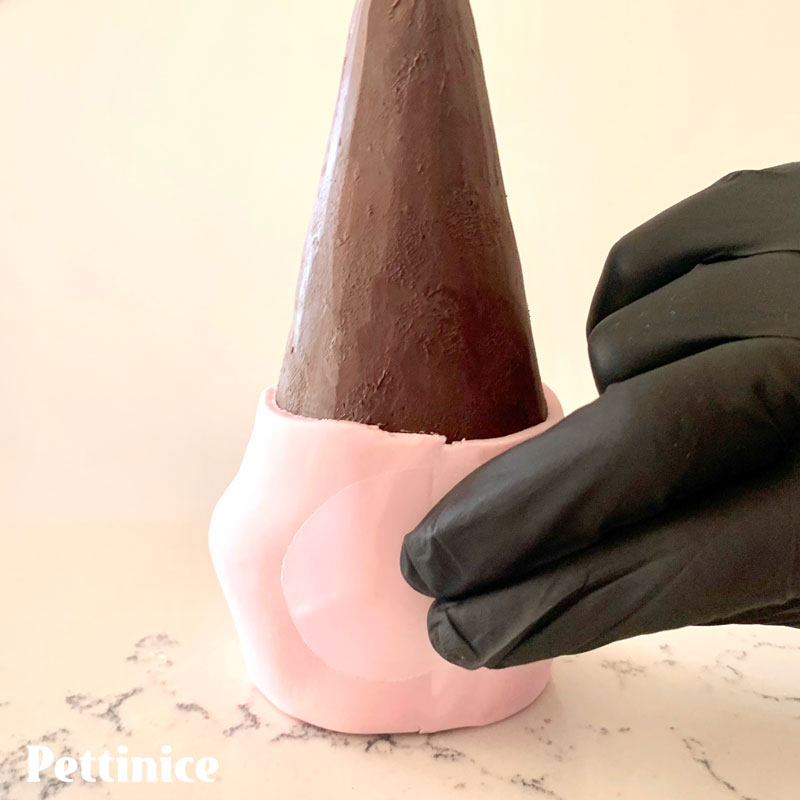
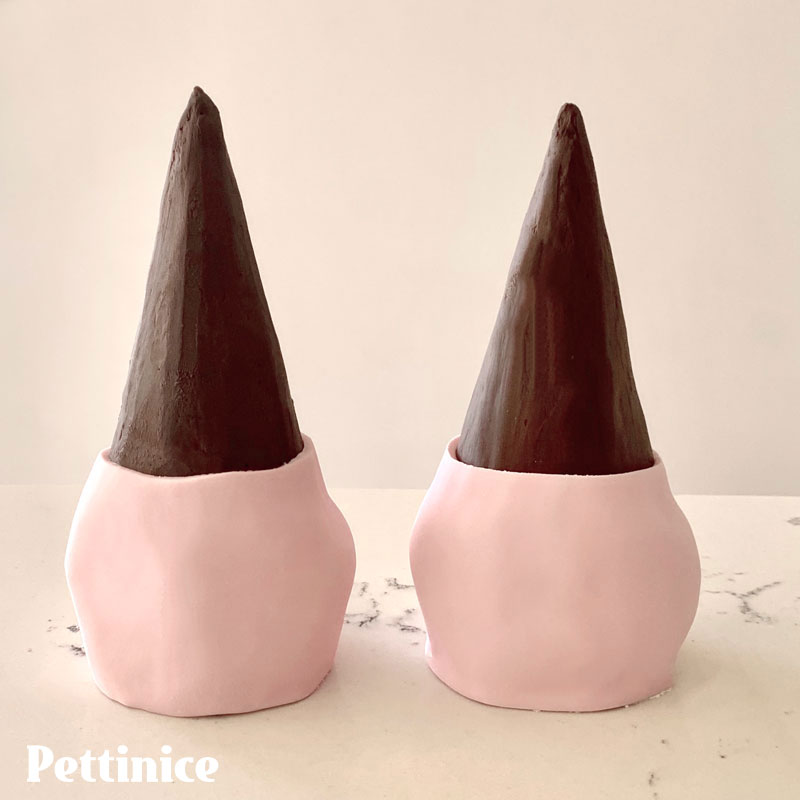
10 &11. Wrap both cakes and bottom portion of cone as shown. If the ganache is slightly tacky or has a little condensation on it the fondant will stick, otherwise brush a thin layer of the seived jam all over the bottom 8cm of the gnome. The join should be at the back i.e. the opposite side to where you carved. Smooth the Pettinice onto the cake, trim away excess at the join, and smooth the join with your hand or a flexible smoother.
WORKING ON MR. GNOME
The beard
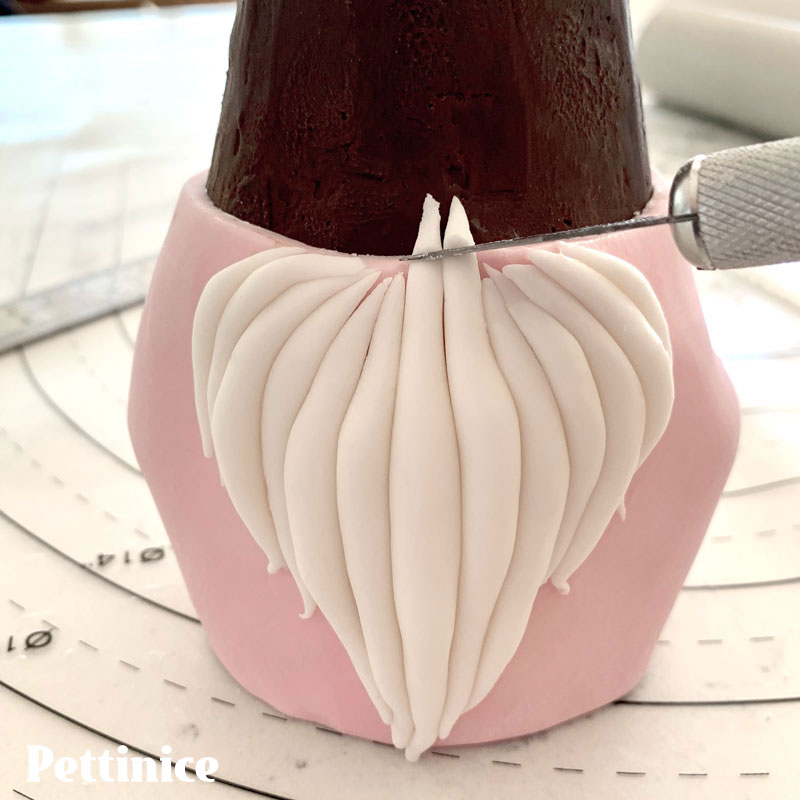
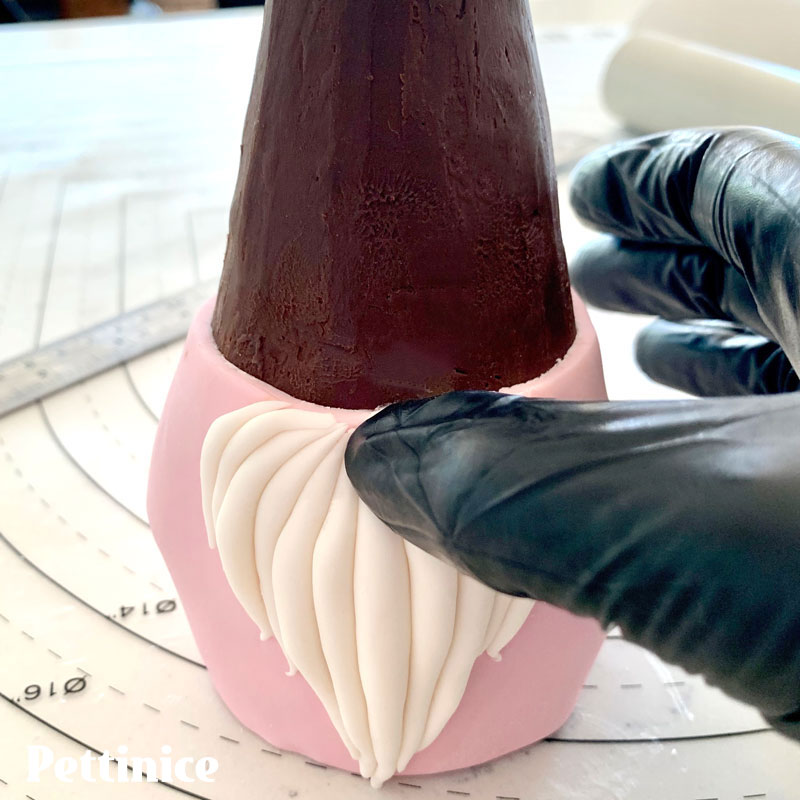
12.With white Pettinice, roll a thin sausage with pointed ends about 6 cm. long.
Place this down the centre of the gnome’s face - the carved side. Make progressively shorter lengths, place them on each side of the centre piece, as shown.
Keep the top end of each piece of beard at the top edge of the pink Pettinice. Trim the top if necessary.
You can be really creative here if you like. Make the beard curly or wild and bushy or just straight up and down. (I added some shorter lengths later but I think I prefer it just like this photo.)
The nose
13. Using your thumb or a ball tool, make a slight indent at the top-centre of the beard where the nose will go.
14. Add a little ivory or peach gel colour to enough white Pettinice to make 2 noses about 6g ea. Alternatively you can make a flesh tone by adding a little yellow and a little pink to your white. Roll 2 balls to make 2 noses. They can be round or oval - it’s up to you. Put one aside. Attach the other in the indent with a little Tylose glue. (If you want to make a particularly large nose you may need to use a length of spaghetti to spear it to the cake).
The arms and hands

15. Roll 50g light pink Pettinice into a long sausage about 1cm diameter. Cut into 4 lengths of about 6cm. Keep Mrs. Gnome’s arms under a cup or in a plastic bag until needed.
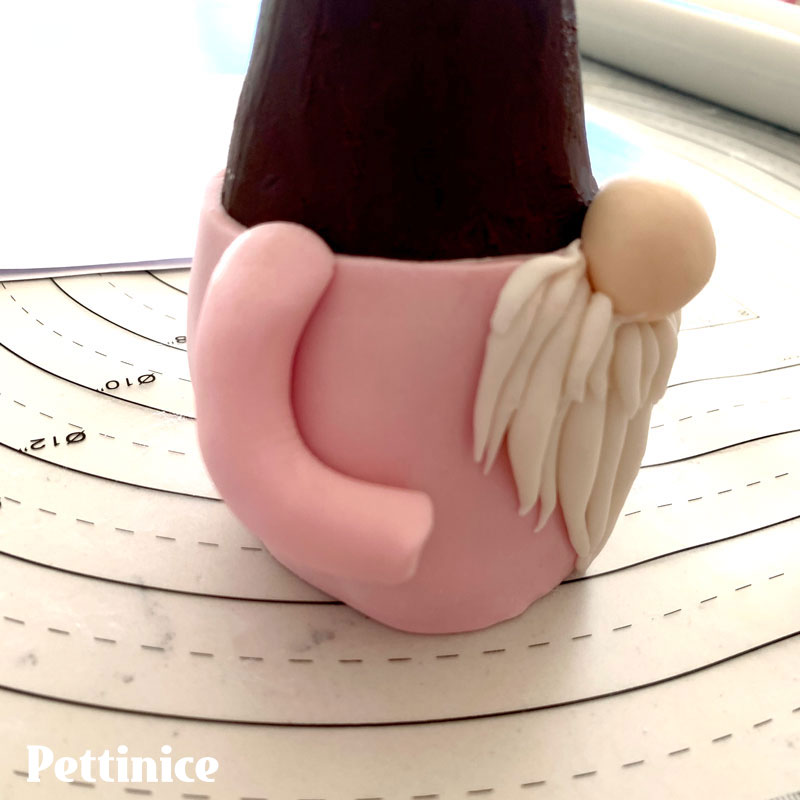
16. Curve the arms and attach to the body with a little water or edible glue and round the shoulders off where the hat will meet the body.

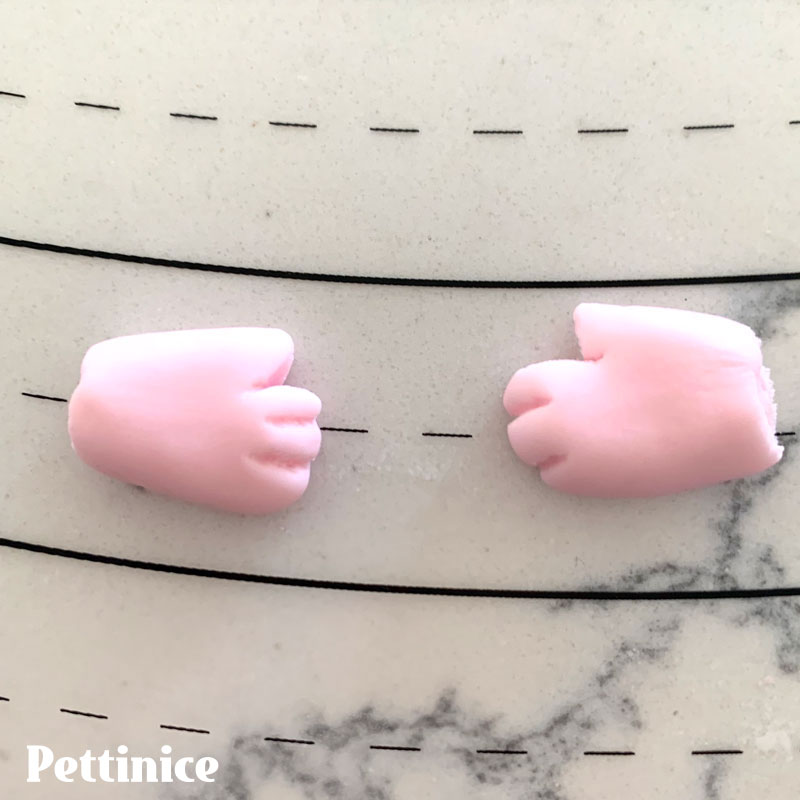
17. Using some of the darker pink Pettinice, make marble sized balls and flatten into teardrop shapes for mittens.
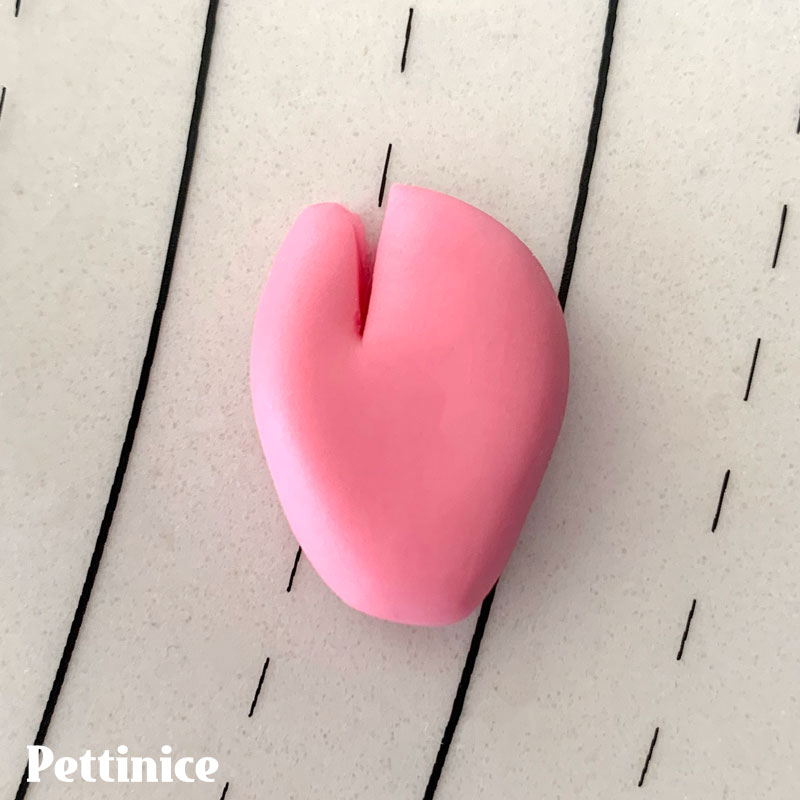
18. Make a little cut to form the thumb.
19. Round off the cut edges to look like a pair of mittens.

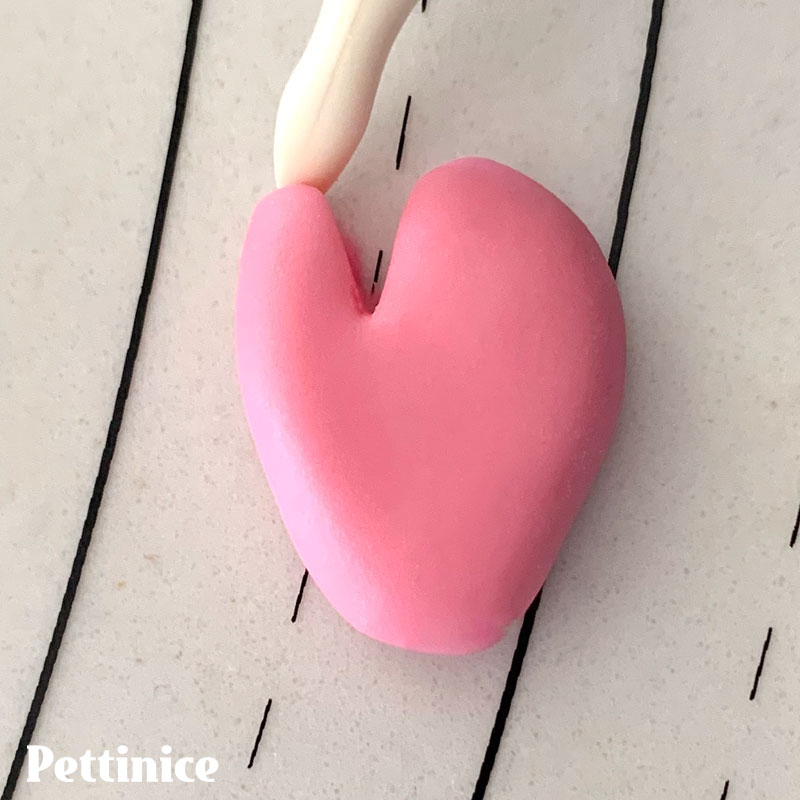
20. If using a lollipop, make a notch in one mitten by pressing the stick down gently into it.
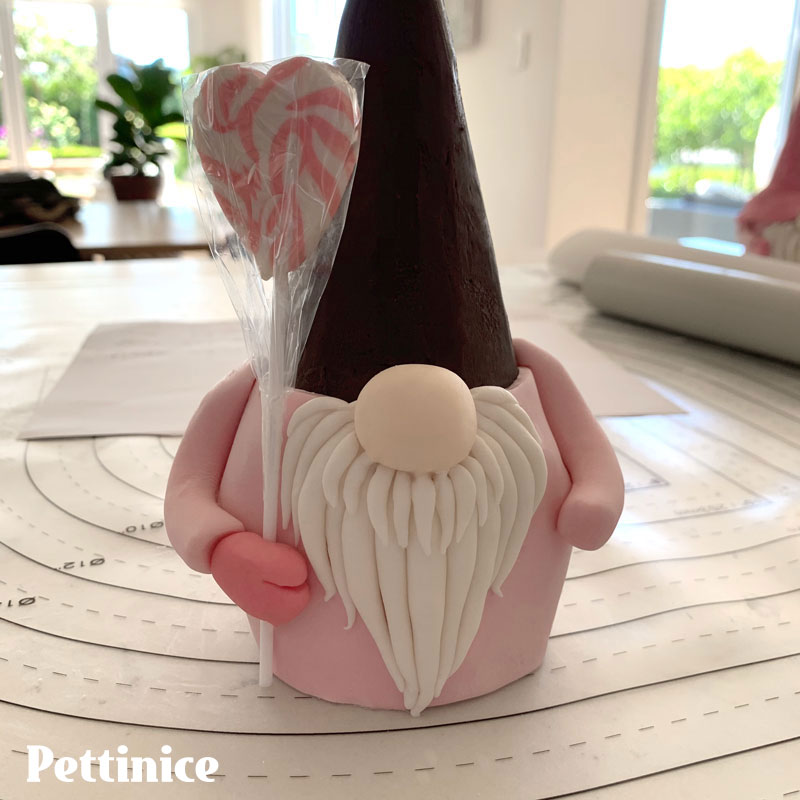
21. Glue the hand to the arm and to the body, thumb side up, avoiding getting the glue or water on the notched part. Place the lollipop into the notch to check it fits and then remove and set it aside until the hat has been covered.
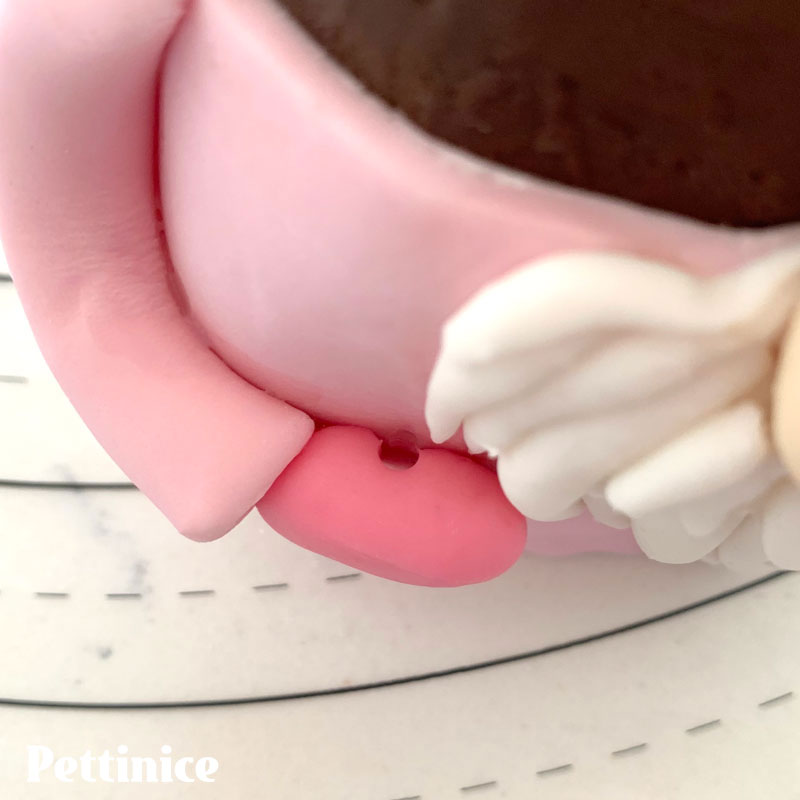
22. Here you can see the hole where the lollipop will go later. Set Mr Gnome aside
Mrs. Gnome
The basic gnomes can be adapted to suit any occasion by changing their clothing colours and accessories
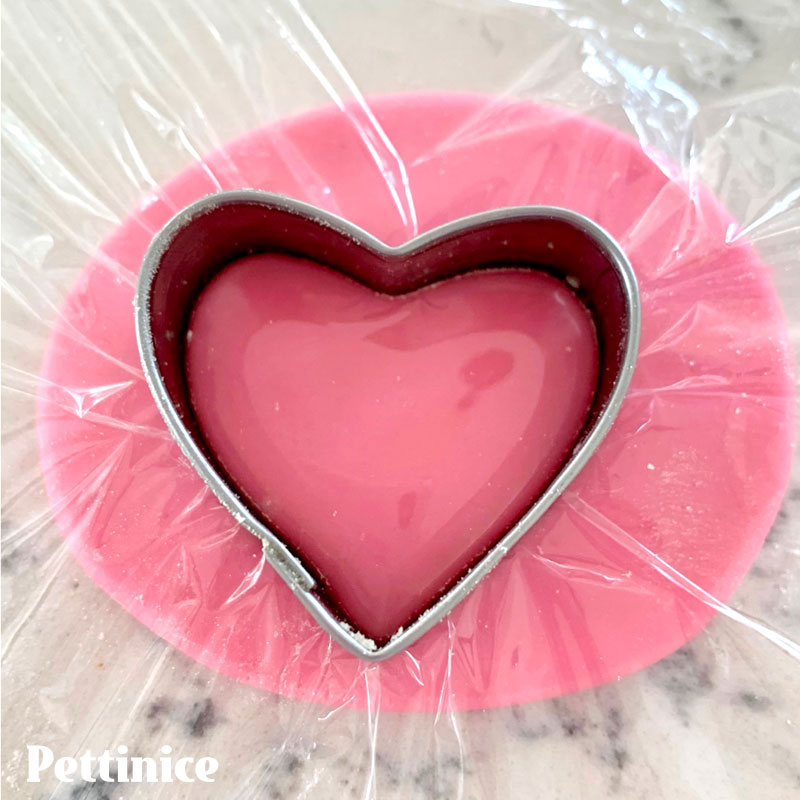
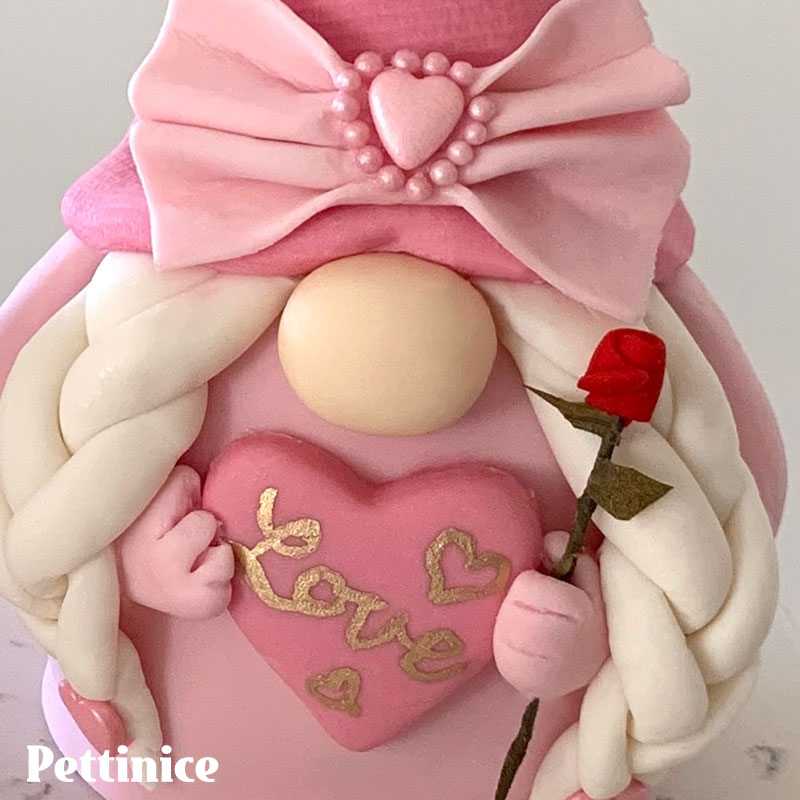
23. First make the heart. Roll out a 15g piece of the darker pink Pettinice to about 4-5 mm thickness. You can add a small pinch of tylose powder to the Pettinice first if you want the heart to firm up quickly. Otherwise just leave it to dry. Place a piece of cling film over it and cut out the heart through the cling film.
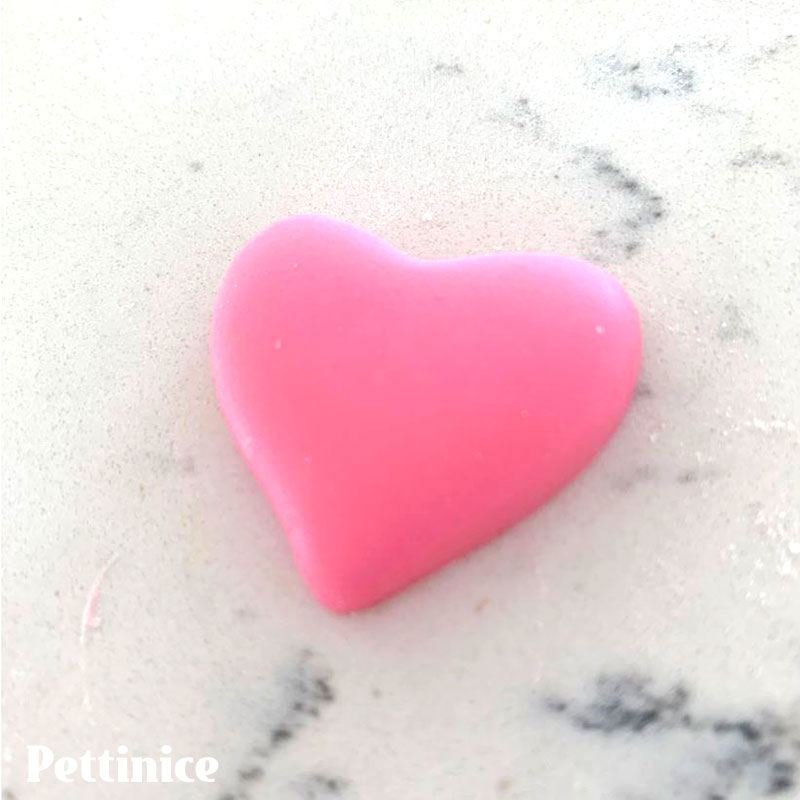
24. This will give it rounded edges like a cushion.
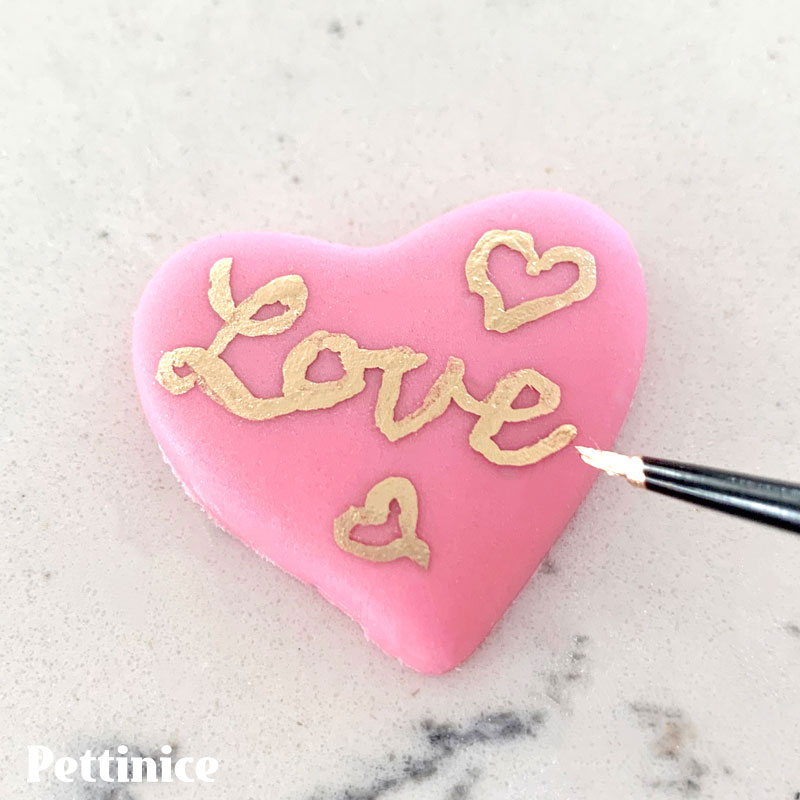
25. Now you can paint a short message or design on the heart or leave as is. I used a little gold dust mixed with alcohol and painted with a fine brush. An edible ink pen would work really well if you have one.
26. Make an indent and attach the nose.
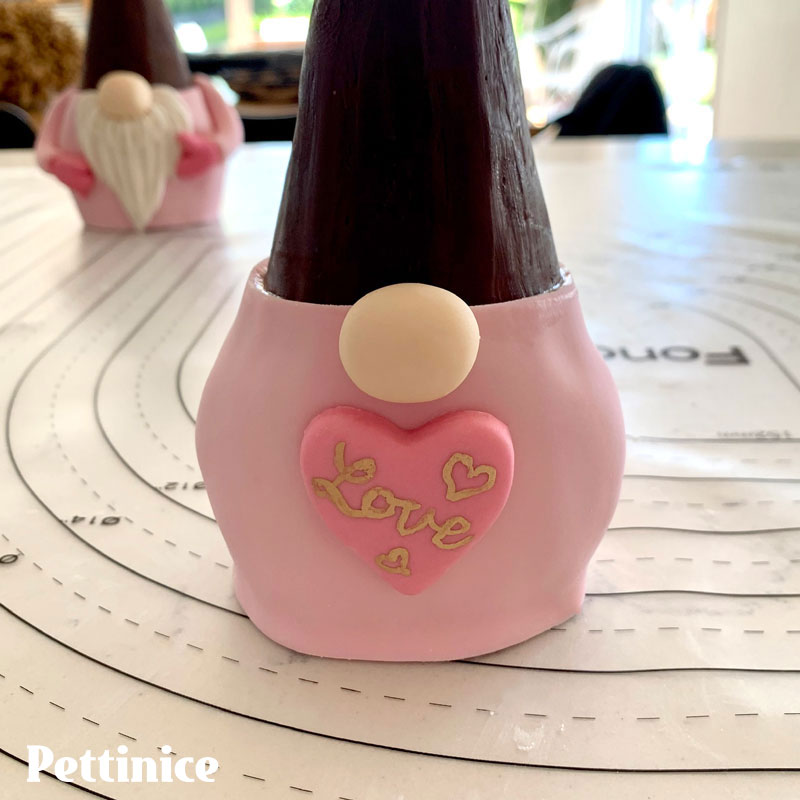
27. Glue the heart in place below the nose. Just use a scant amount of glue or water. If it’s too wet it will just slide off the body.
28. Make the hands the same way you made Mr. Gnome’s hands. You can add fingers for variety or leave as mittens.
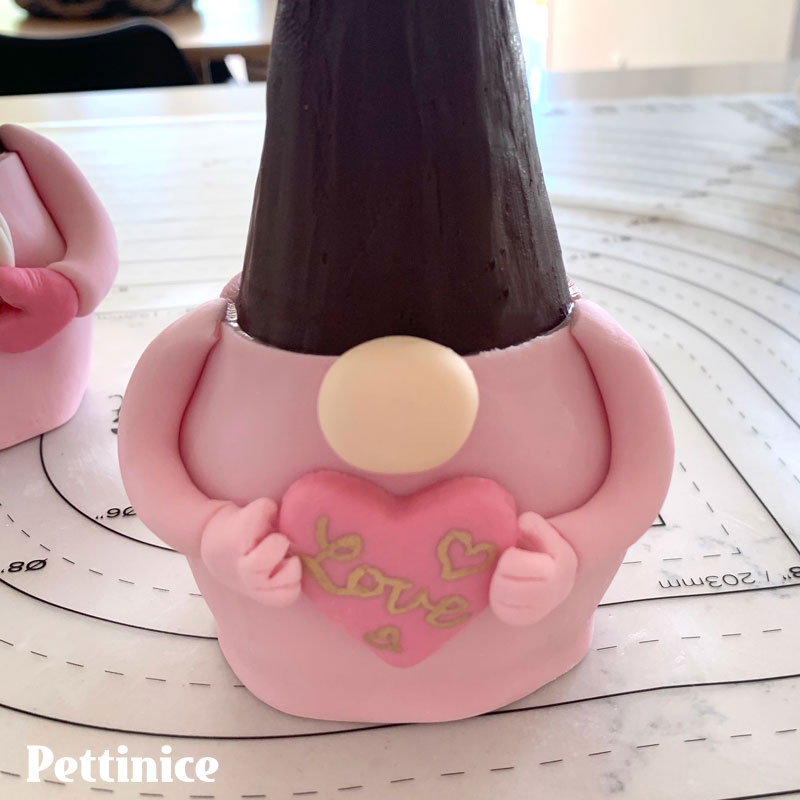
29. Attach the arms you set aside earlier, and then the hands so they appear to be holding the heart.
The plaits
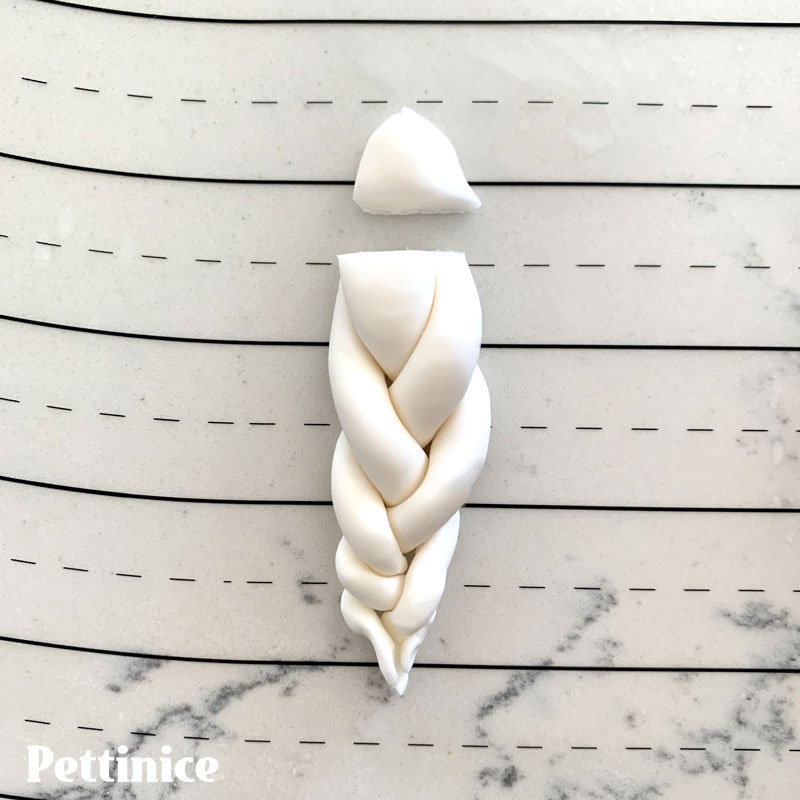
30. Roll 6 tapered sausages of white Pettinice about 6cm long. They can be thin or thick depending on the look you are going for. I made the top ends of mine fatter than the bottom ends. Glue the top ends of 3 lengths together and plait. Repeat. Trim if necessary.
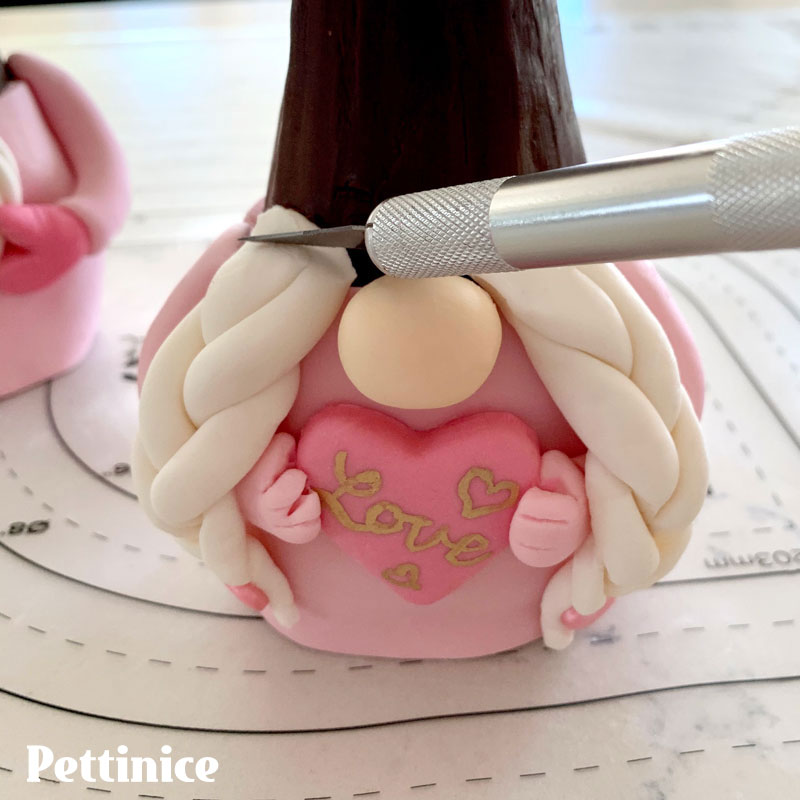
31. Glue the full length of the plaits on either side of the nose and down over the arms. Finish the bottoms with a candy or Pettinice heart or bow.
The hat
32. Roll the darker pink to about 2mm thick. You can add interest by rolling with a texture mat if you like. I have a variety of drawer liners from the ‘$2 Shop’ that have wonderful textures. This is a woven look but you might choose to add stripes or hearts or flowers. Anything goes!
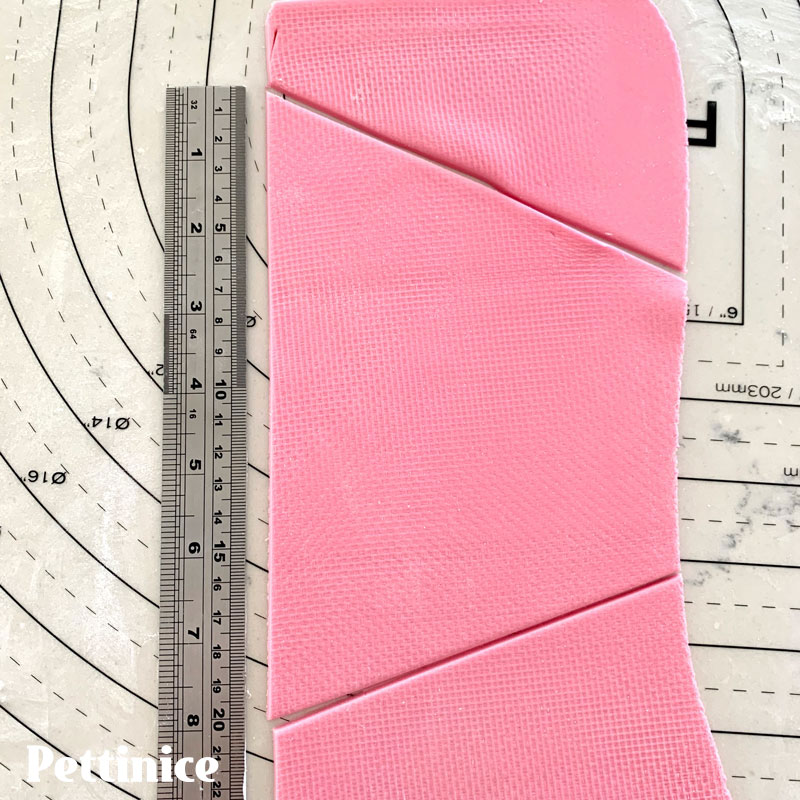
33. Cut a rectangle that is 20cm long by about 14cm deep. Cut the 2 corners off to make a trapezium shape as shown. You don’t need to be too accurate here as long as there’s enough to cover your cone-shaped hat. This will be plenty. You will be trimming some off at the back.
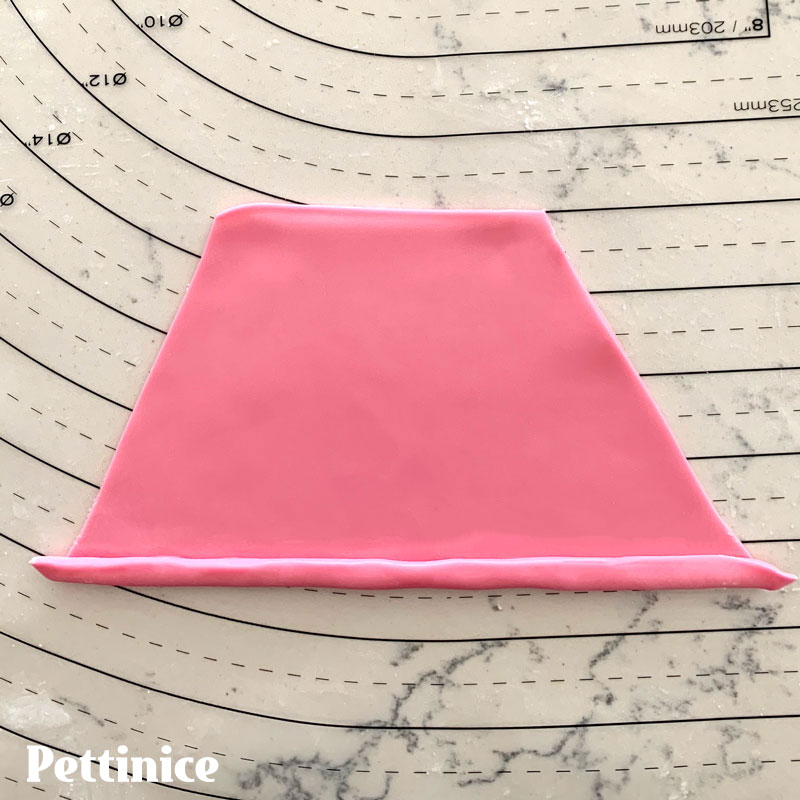
34. Flip the shape over and fold the long edge up on itself to make a small brim. Brush the entire ganched hat area with the thinned apricot jam very lightly, if necessary. (Not shown)

35. Apply the trapezium shape to the gnome so that the seam will be at the back. The long folded edge is the bottom of the hat. Start by pressing the centre of the shape to the centre front of the gnome, then wrap both sides around to the back. Make sure the textured side is facing out and the folded edge is tucked under. Let it drape slightly down each side of the nose and a little over the shoulders.
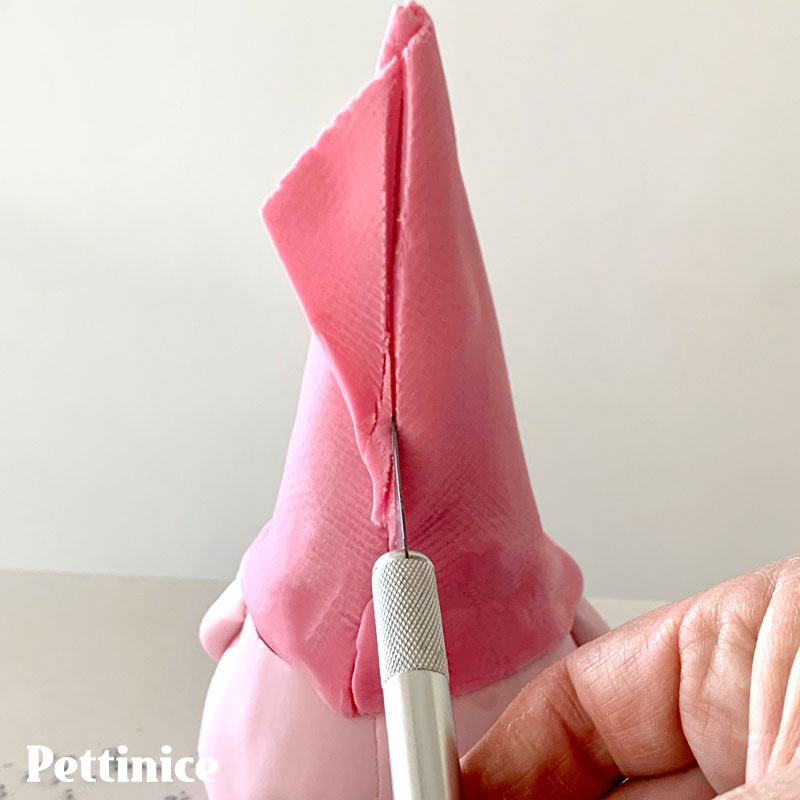
36. Gently smooth against the cone and cut off the excess neatly at the back with your blade or craft knife. You can trim the point straight or have a little bend in it.
The embellishments
You can embellish your gnome however you choose but here’s what I did:
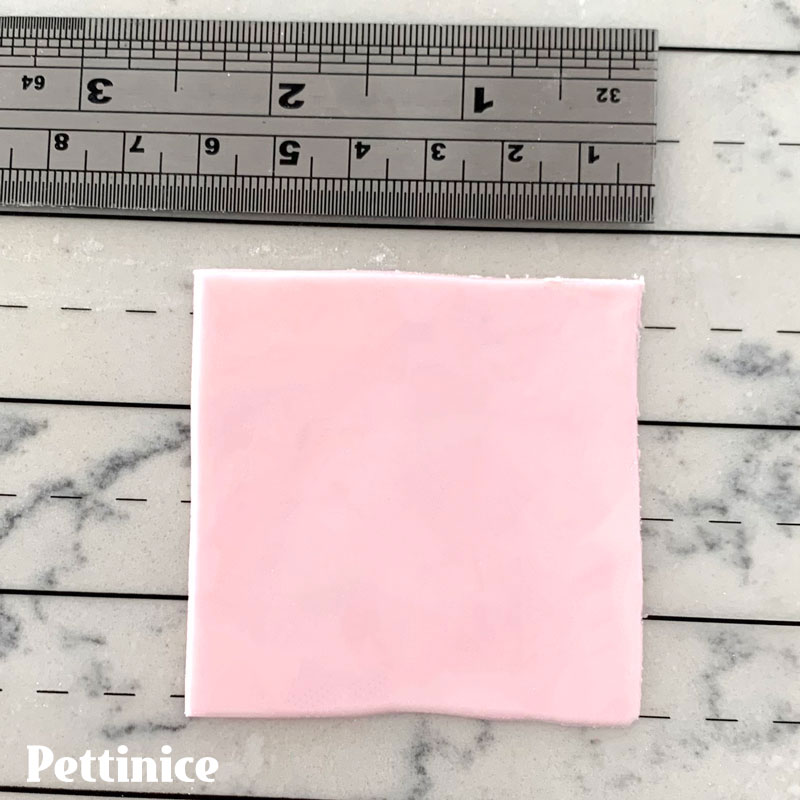
37. For the bow I rolled a 1mm thick square 6cm x 6cm and loosely pleated it,
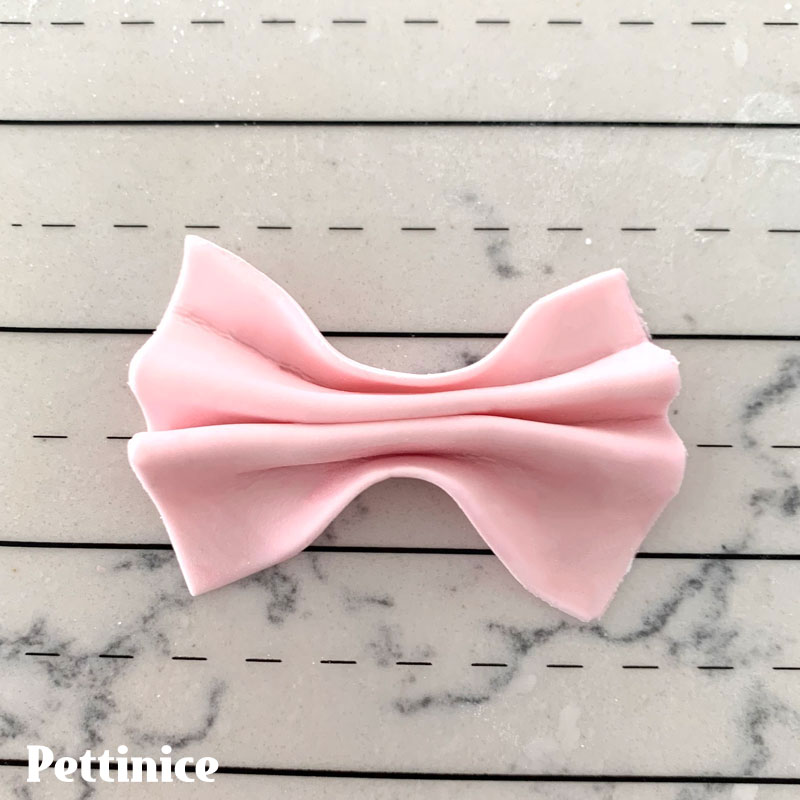
38. I pinched the centre to make a simple bow. I glued the pleats together very lightly at the centre. Later I added a heart and some pearls from a sprinkle mix. This went onto the front of the hat when dry.
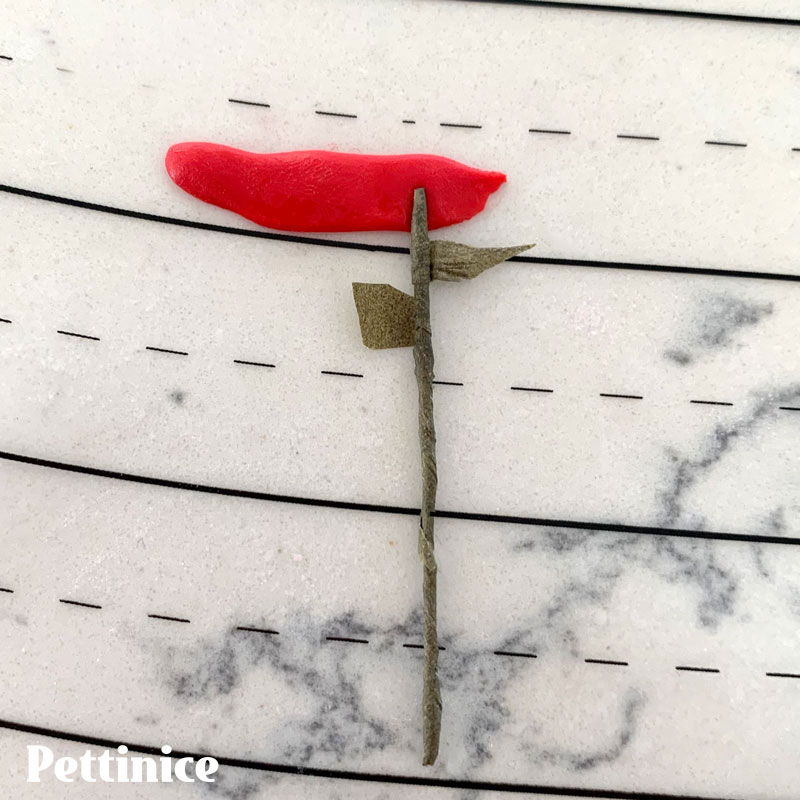
39. I made a very simple rolled rose with covered floral wire and a small strip of red Pettinice. The leaves are cut from florist tape. You can use a stick of thin spaghetti for the stem if preferred and to keep everything entirely edible.

40. Just roll the red strip around the end of stem. Use a dab of glue or water to hold in place.
41. Place the rose in her left hand.
Mr Gnome's hat

42.Use the light brown Pettinice. Make 3 tapered sausages and stick onto the ganache as shown. Use jam if it’s not sticking. This is to give the hat a bit more shape and dimension.
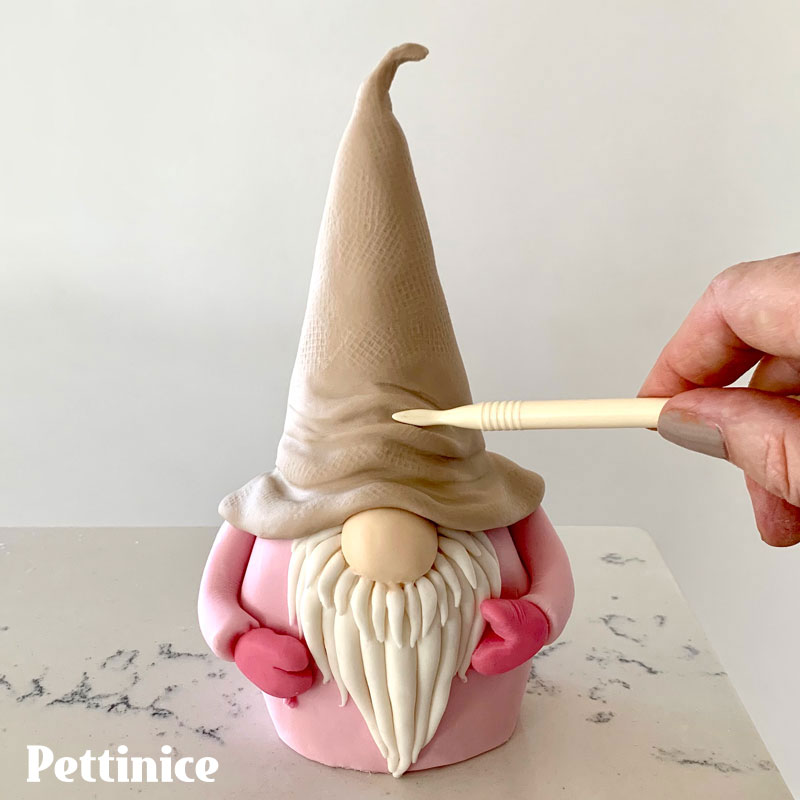
43. Proceed with the light brown Pettinice to make the hat the same way you made Mrs. Gnome’s hat, the only difference being the shaping you have just added. Define these wrinkles with a Dresden tool.
Optional
You can dust a little pink flower dust or lustre on their noses and on the pink hat to bring out the texture and a little brown dust to accentuate the wrinkles and texture on the brown hat


Tracey van Lent owns The Cake Craftery in Riverhead, Auckland. Tracey’s background is in art and design and she gained a Bachelor’s Degree in Visual Communications when her four children were young. She has been decorating cakes for many years and has taught classes in her local community in North-West Auckland in more recent years.
She loves working with Pettinice in every aspect of her fondant work and particularly likes the unlimited palette of colours that can be produced by just mixing together the colour range.
See more of Tracey's cakes at


Want to see more tutorials?