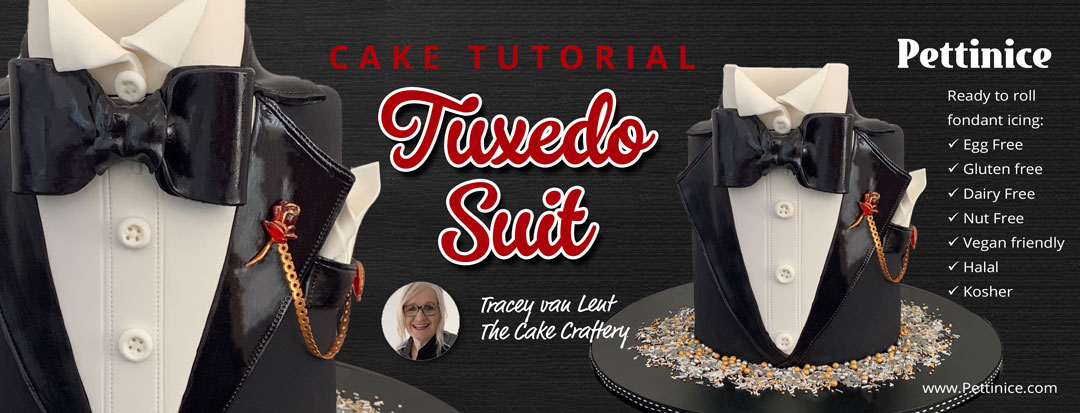
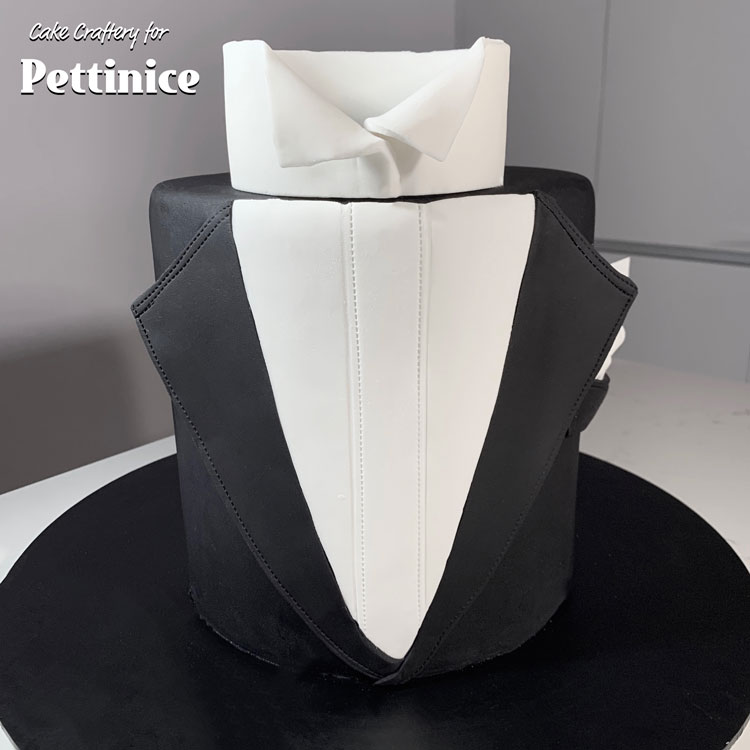
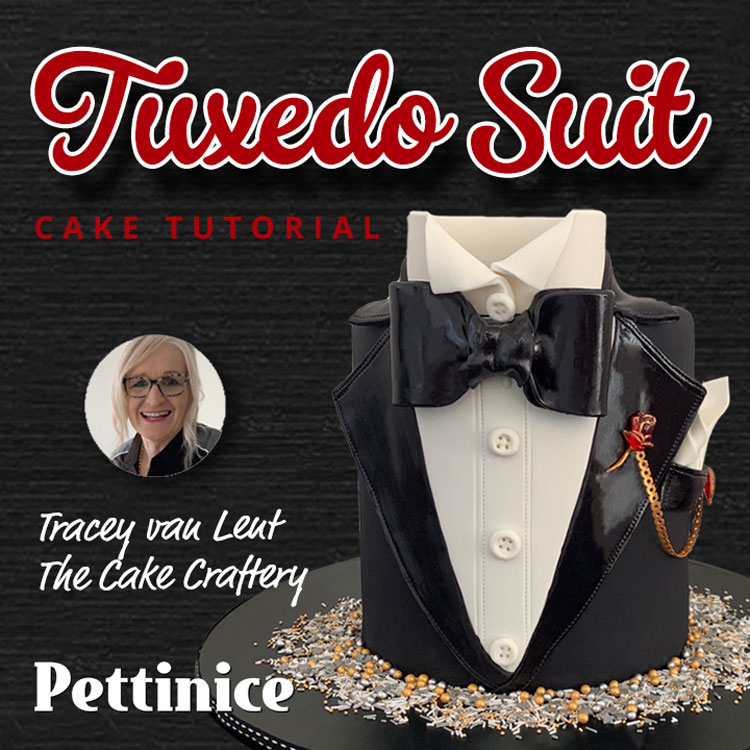
Tuxedo suit cake tutorial
TOOLS AND MATERIALS
- Rolling pin
- Cutting blade/wheel and mat
- Stitch-making wheel
- 20cm square of corrugated cardboard
- A strip of heavy card
- 2 pieces of paper to roll for bow
- Sticky tape
- Scissors
- Ruler
- Printed Templates
OPTIONAL EXTRAS
- Gold lustre
- Rose spirit or alcohol
- Small amount coloured Isomalt
- Edge of a piece of edible cake lace (or gum paste and chain mold)
- Sprinkles for board
- Edible glaze
- Silicon mold of your choice for lapel badge/brooch.
EDIBLES
- A tall cake, pre-covered in black Pettinice fondant, on a black board. This cake is an 8”/20cm cake which is also 20cm tall. It took about 2000g of fondant rolled to 3mm thick to cover. This is quite a large cake so scale everything down if preferred.
- An additional 240g black Pettinice fondant plus 240g white Pettinice fondant
- Edible glue
- A stick of spaghetti plus small amount of royal icing, chocolate or Isomalt to stick bow to cake
CLICK HERE for a tutorial on how to cover tall cakes using the wrap method with Pettinice.

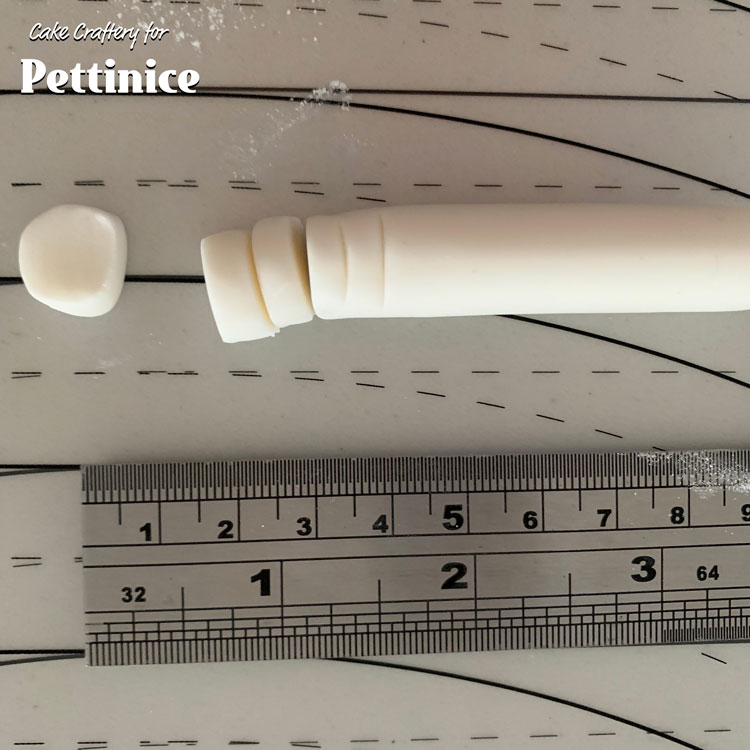
How to make a fondant bow tie
Making the bow tie
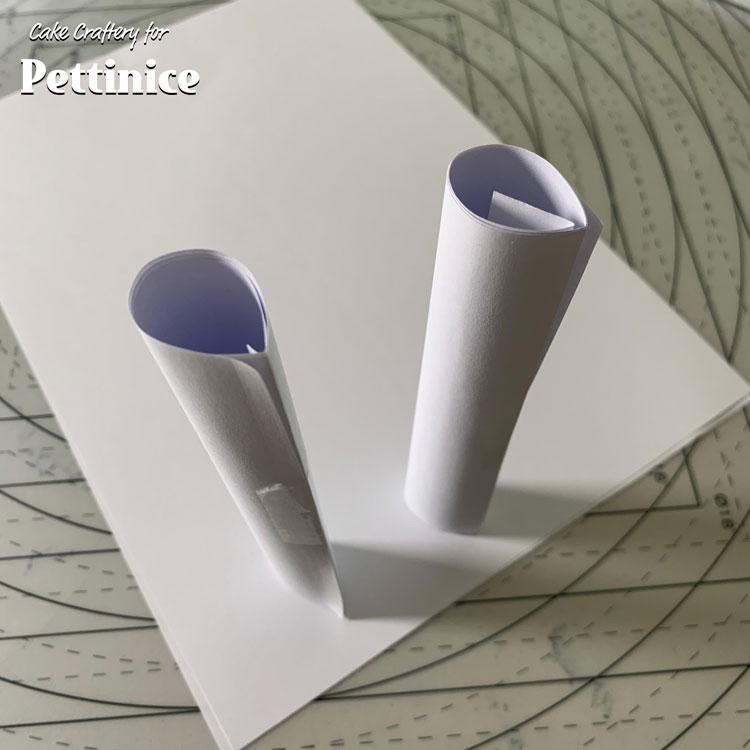
Start by making the bow-tie. Roll 2 paper tubes into 2cm diameter rolls. Press a crease into one side of each roll to make it teardrop shaped.
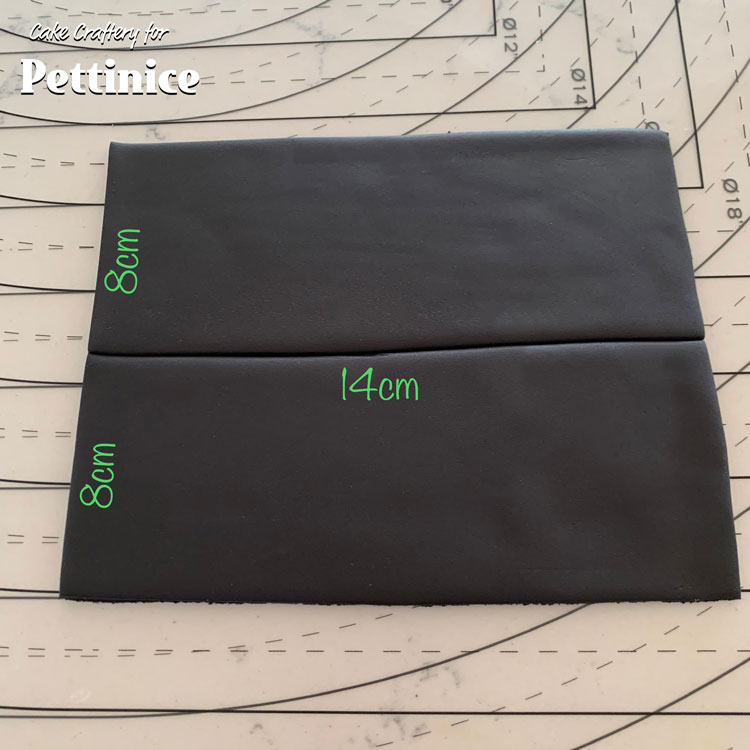
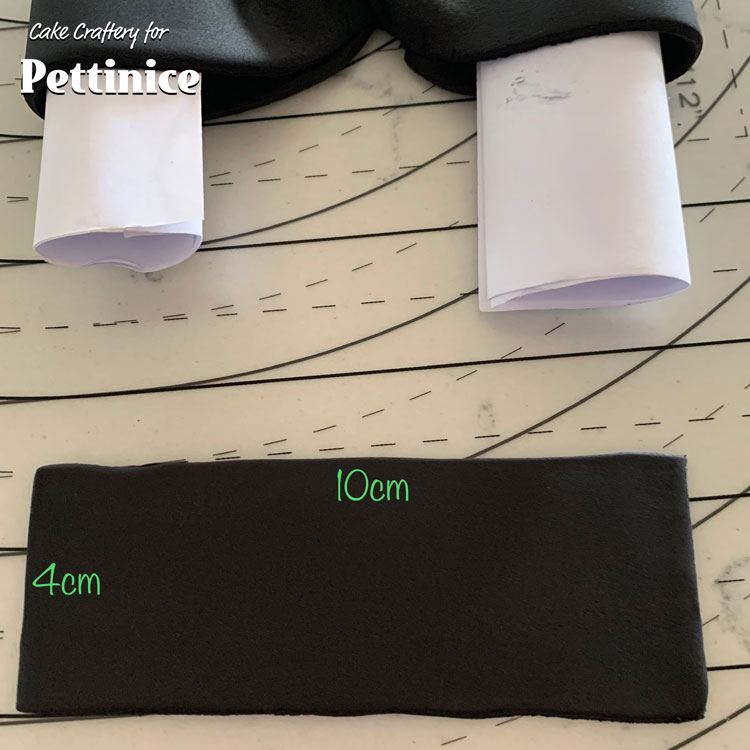
Roll and cut 2 rectangles of black Fondant 14cm x 8 cm.
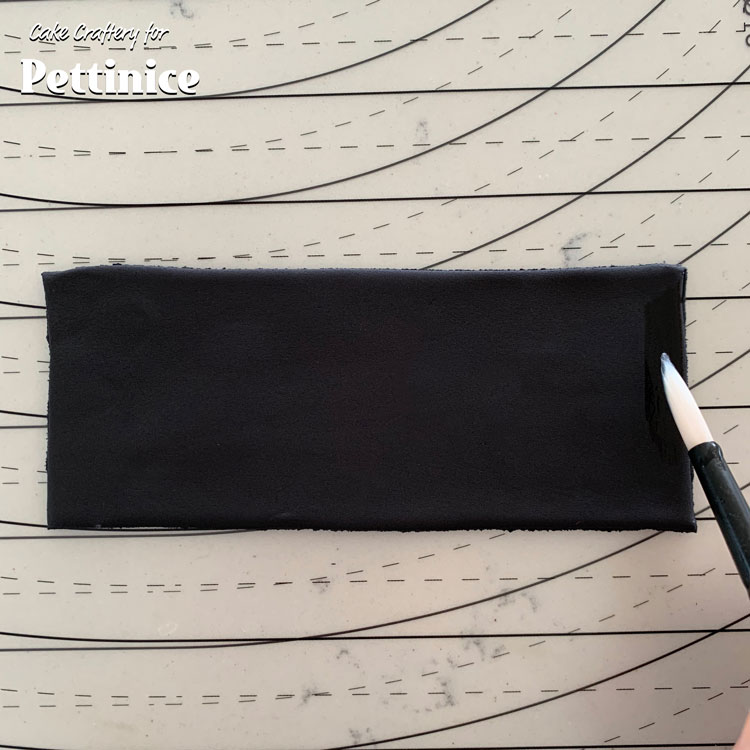
Apply a little water or edible glue to one short edge of one rectangle.
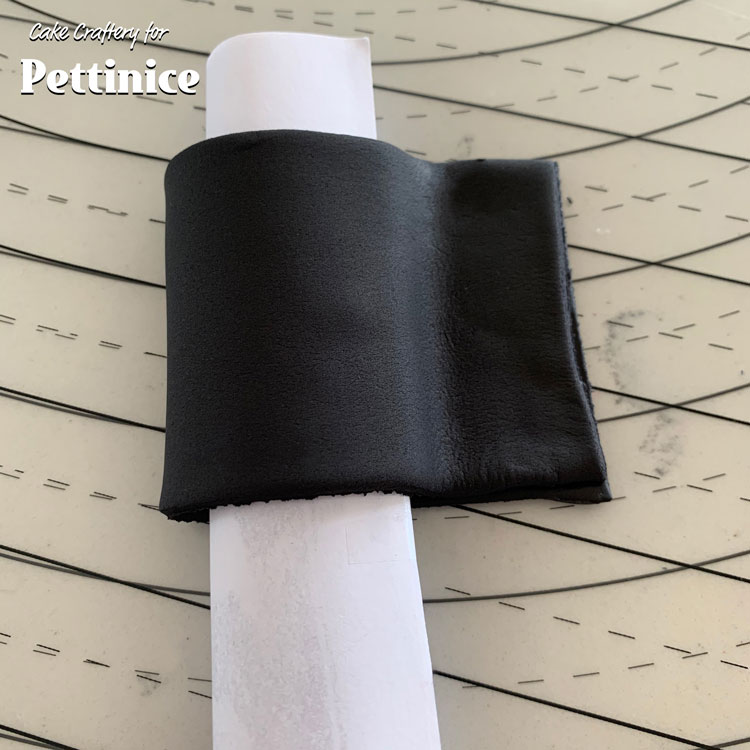
Fold the 2 short edges together, over the paper roll. The teardrop shape of the paper roll forms the bow shape.
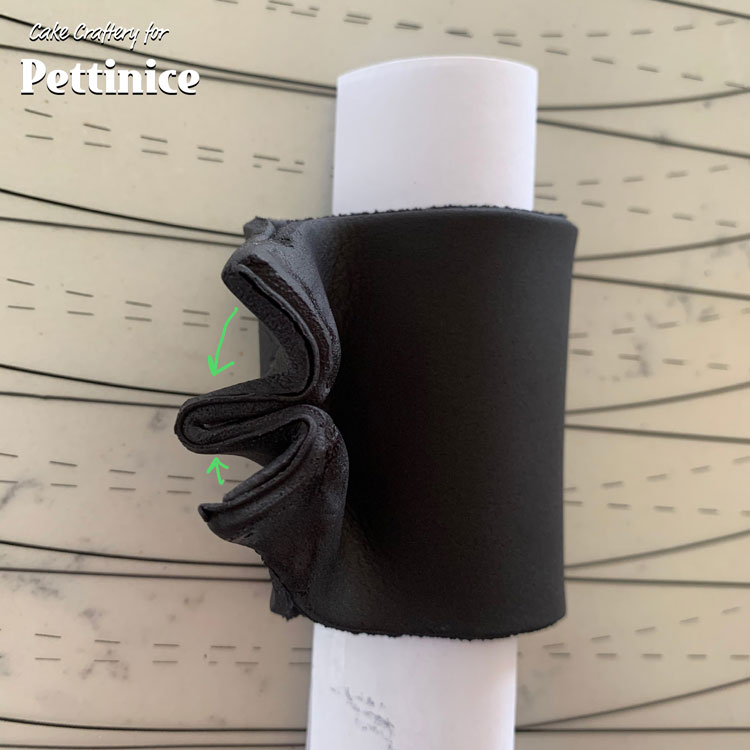
Take the joined end and fold it into an M. Fold at the centre first and then bring the 2 corners in towards that crease. Use a little glue or water to hold it together.
Pinch together and repeat with the second piece.
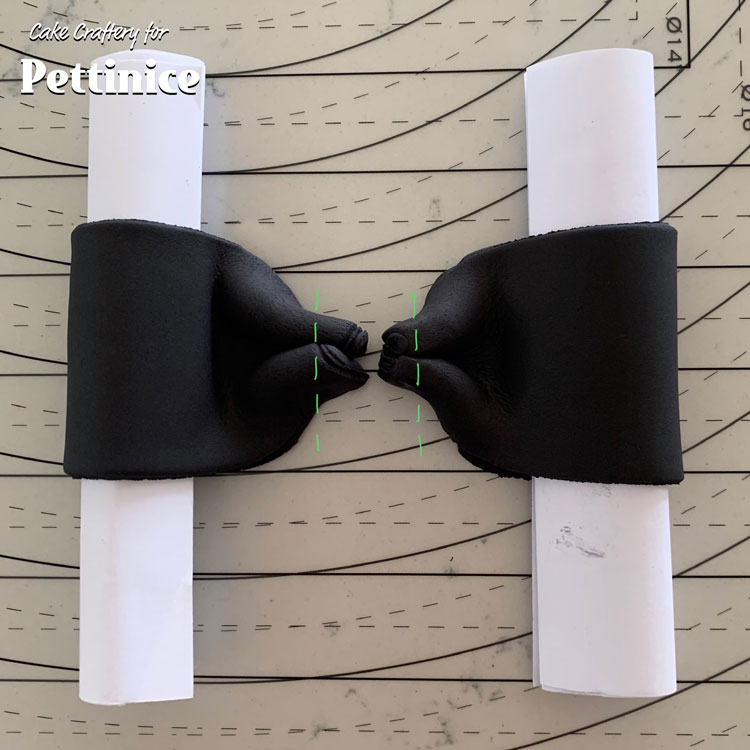
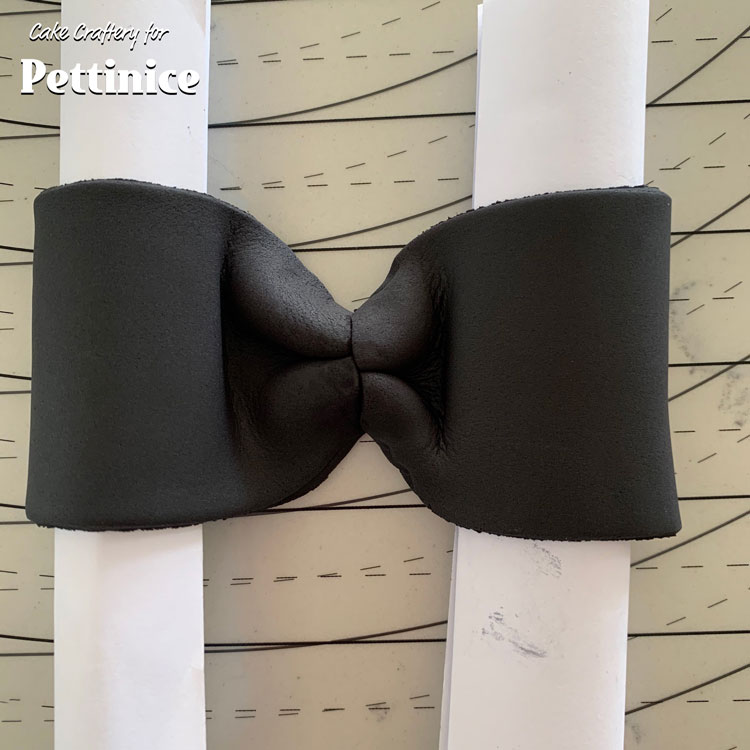
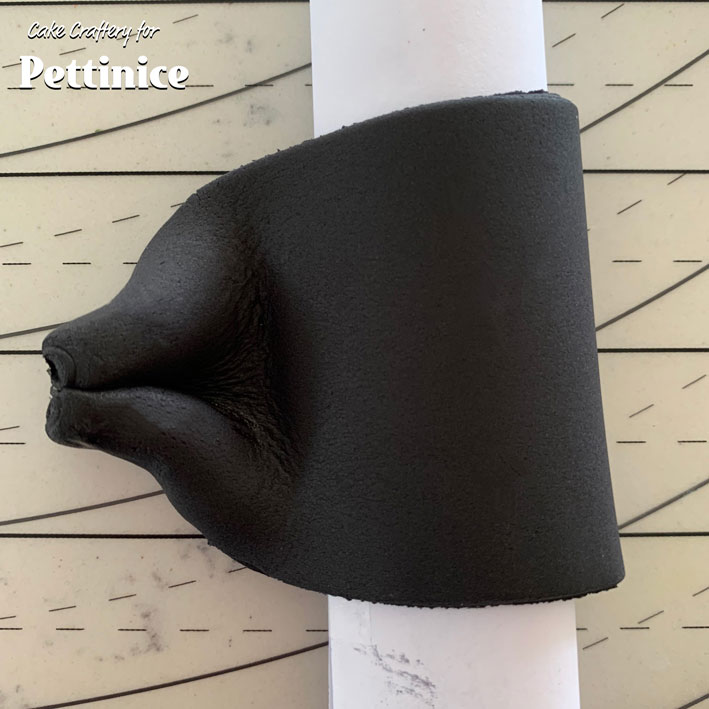
Attach the cut edges together to form the bow, using a dab of water or edible glue if necessary.
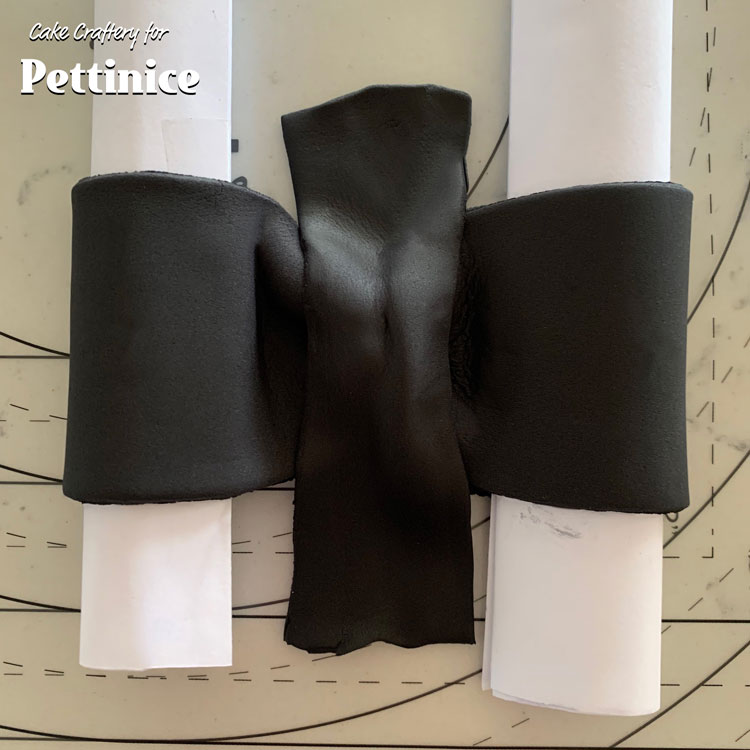
Set this over the join as shown, to form the centre.
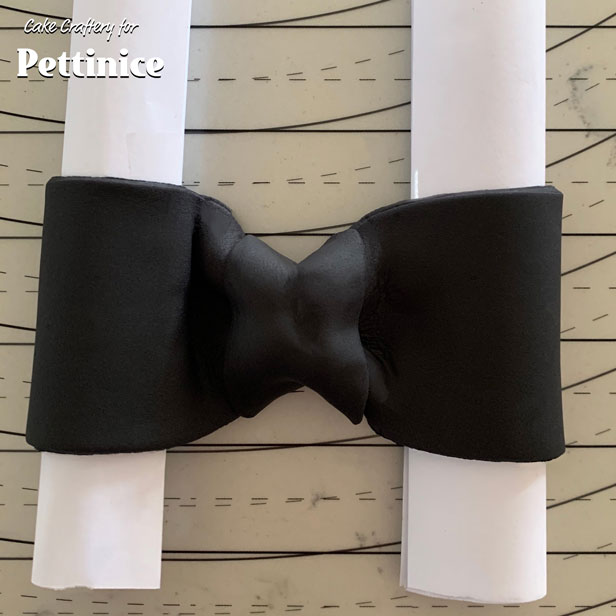
Glue the ends of the strip to the underside of the bow. They will overlap each other. Leave to dry.
How to make a fondant shirt collar
Making the fondant collar
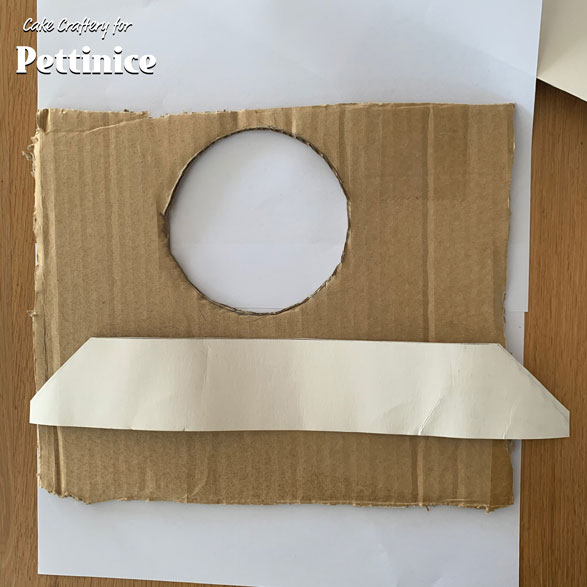
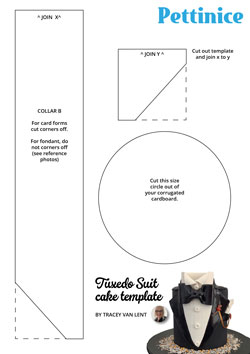
For the shirt collar, first make a form out of corrugated cardboard and a piece of card stock. Cut a circle out of the cardboard 11cm in diameter. Use template A as a guide. Cut the thinner card according to template B.
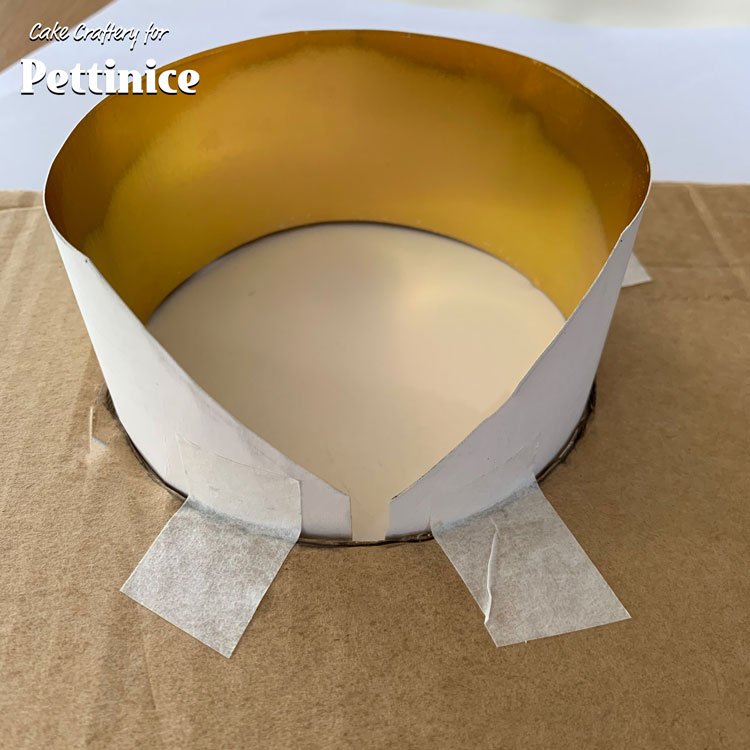
Roll piece B and stand it up inside circle A. Tape into place.
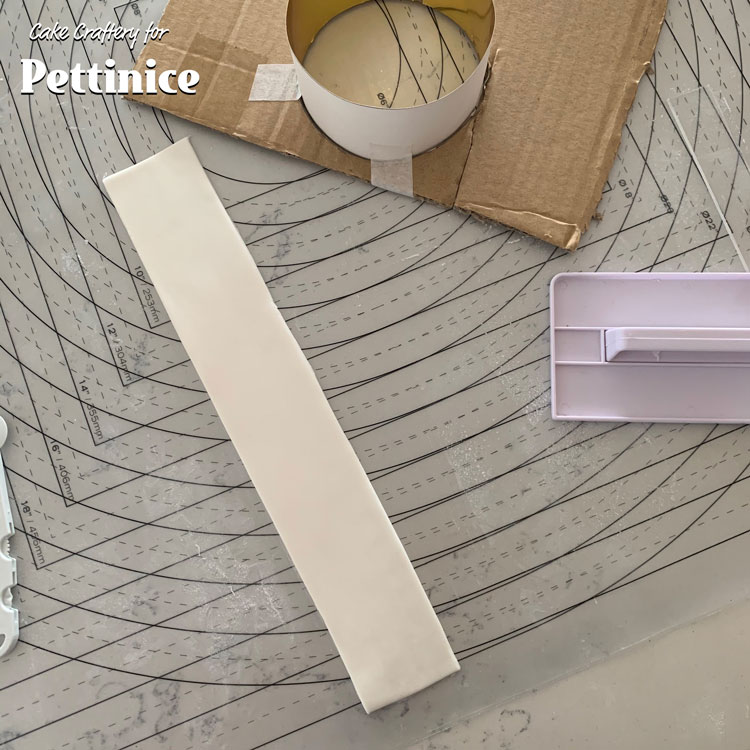
Roll a strip of white fondant the same size as Template B but without cutting off the corners.
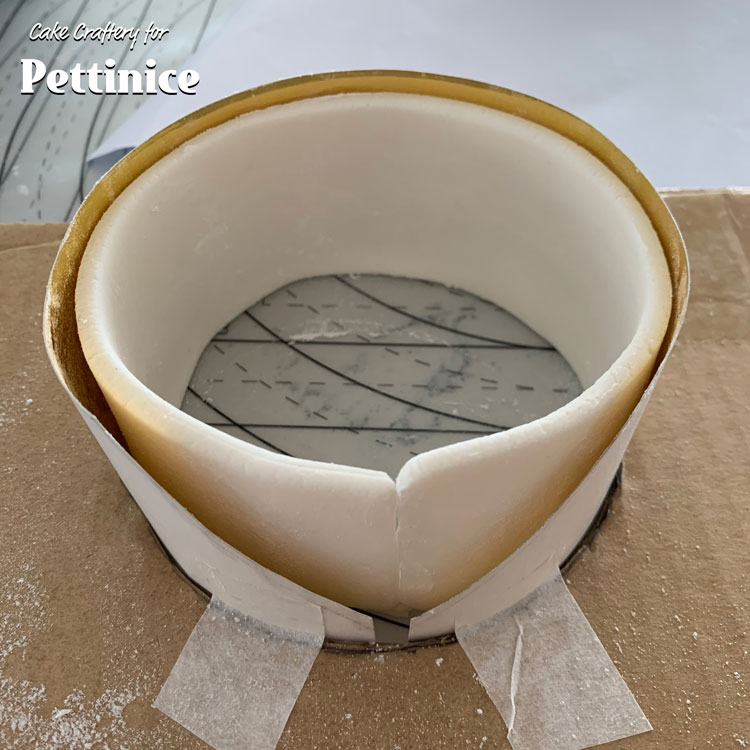
Dust this strip with a little cornflour/cornstarch and stand it up inside your cardboard form.
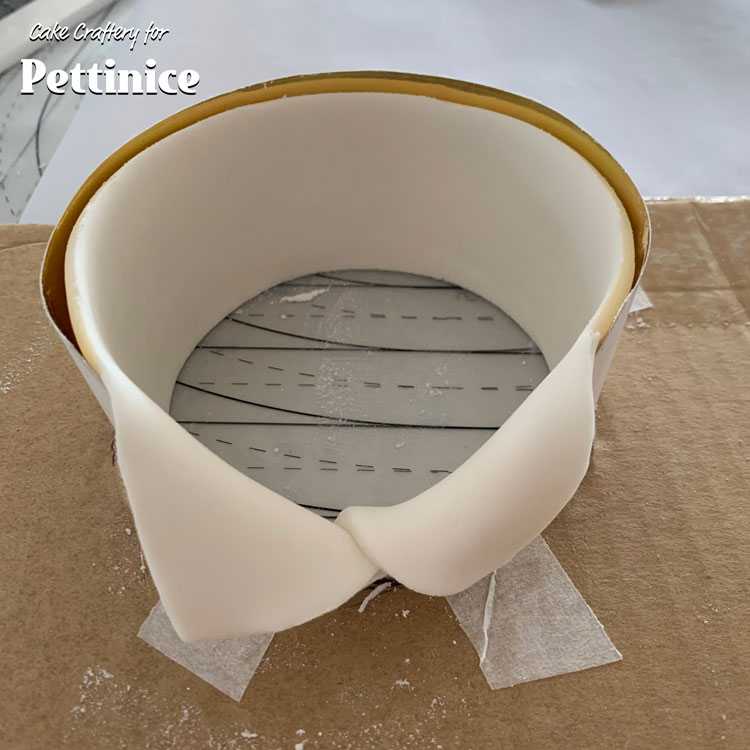
Fold down the two corners over the angles of the form. I have chosen to let mine fall naturally over but you may prefer to make more of a crease-line. Set this aside to dry.
How to make a fondant shirt and tux front for your cake
Making the fondant shirt and tux front
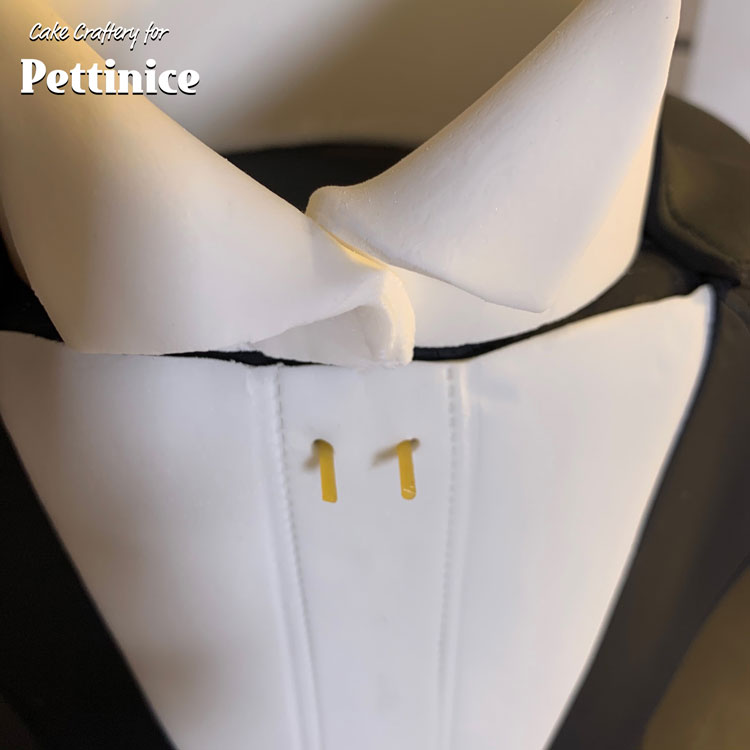
To make the shirt front, use template C and cut out of white fondant.
Instead of adding an extra strip for the buttons, I have just indented 2 parallel lines with a modelling tool. You could press the edge of a ruler into fondant if you prefer. Then run your stitch tool just inside the lines you made.
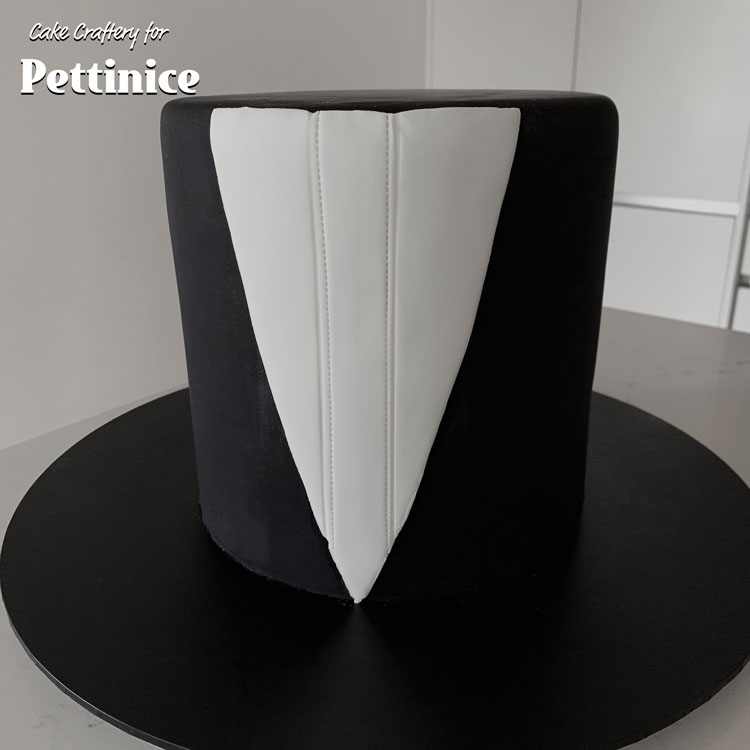
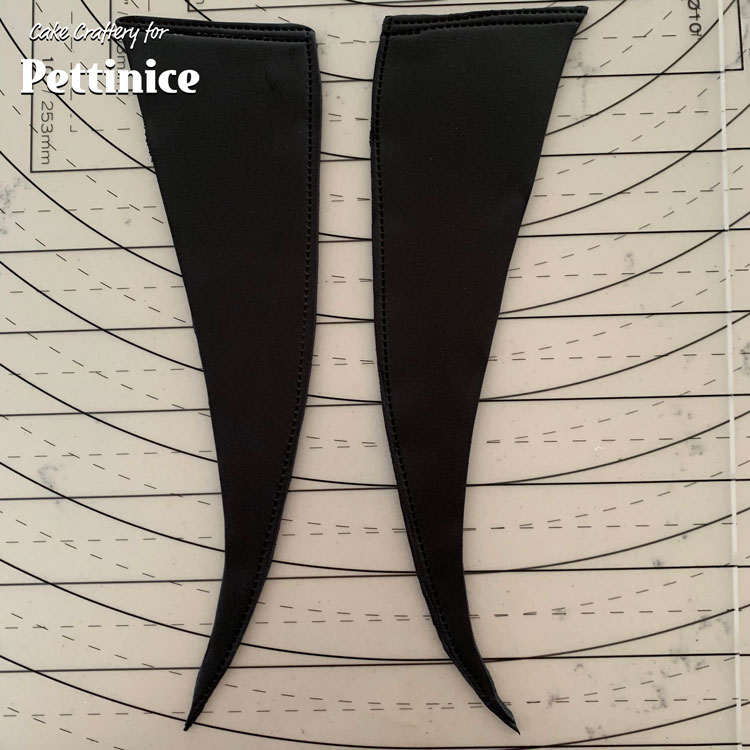
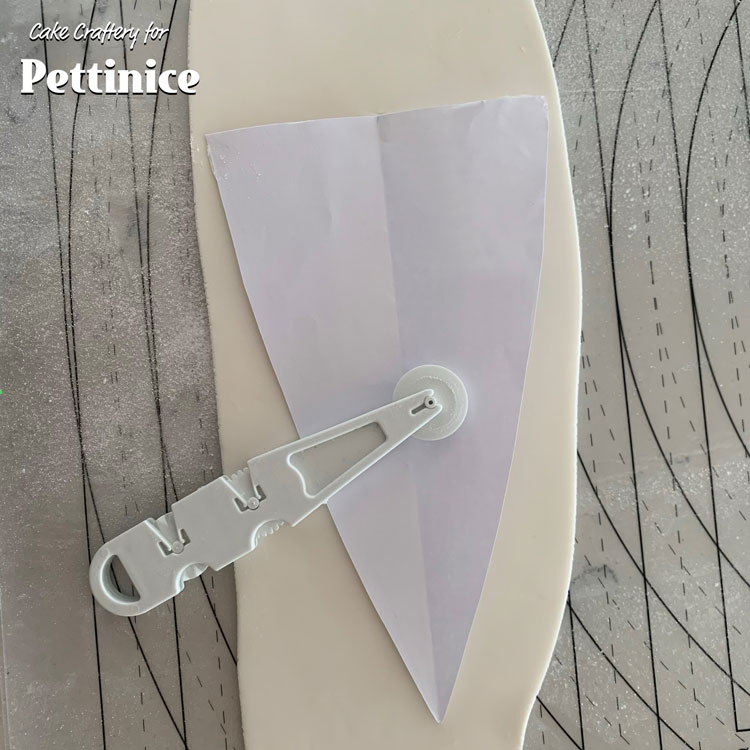
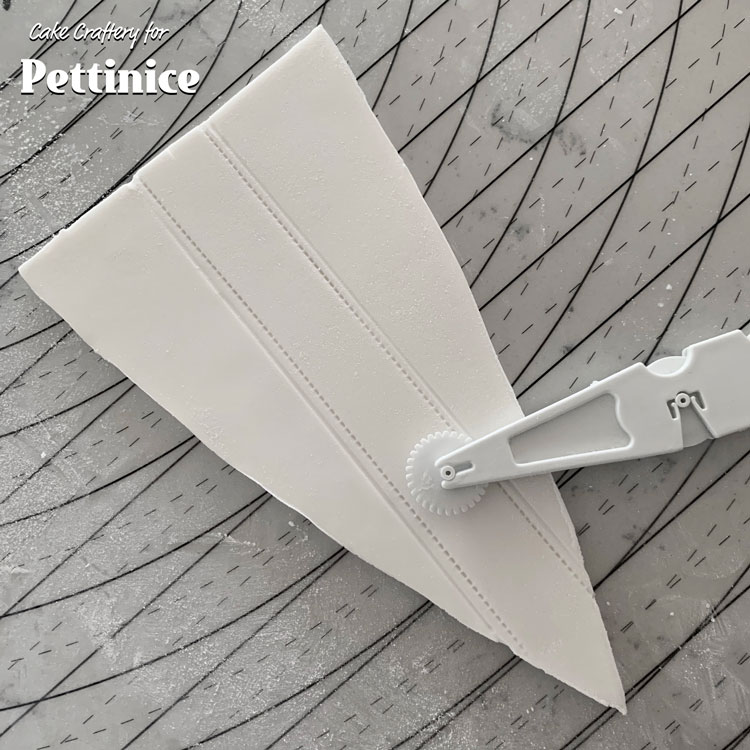
Cut 2 lapels out of black fondant using template D. Cut one side and then flip to make the a mirror image so you have a left and a right lapel. Run stitch lines where shown.
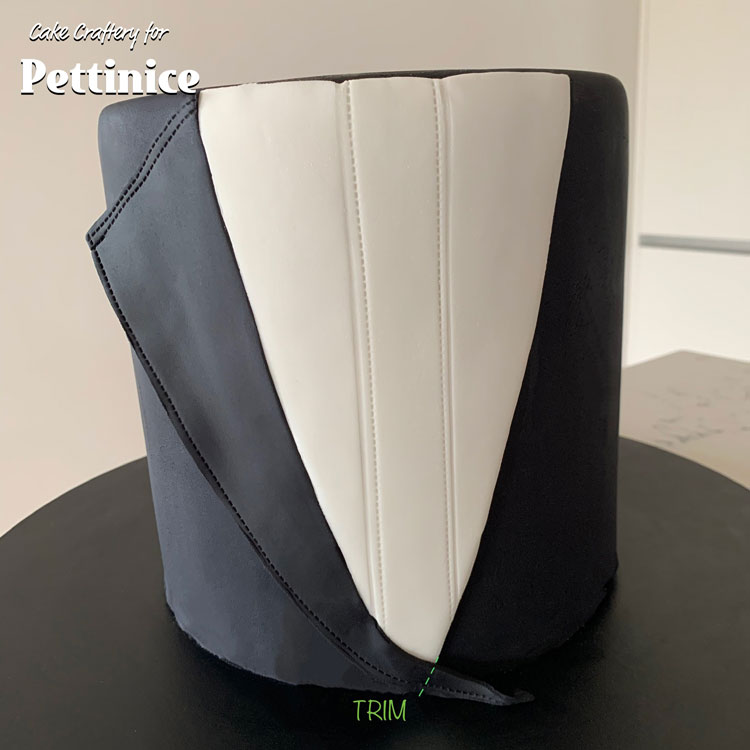
Attach the right lapel to the cake, butting it neatly against the shirt front. Don’t glue the outer edge of the lapel to the cake - let it sit out from the cake to look more natural. Trim the excess at the point as shown.
Now repeat with the left lapel but cross the bottom point over the right lapel point. Trim right at the base of the cake if necessary.
To make the buttons, roll a piece of white fondant to about a 10mm diameter. Cut 5mm slices off the roll. This will give you even sized pieces.

Roll each piece into a ball and then press a piece of doweling or the end of a large glue gun stick down into each ball. This will flatten the centre but leave a nice rounded button edge.
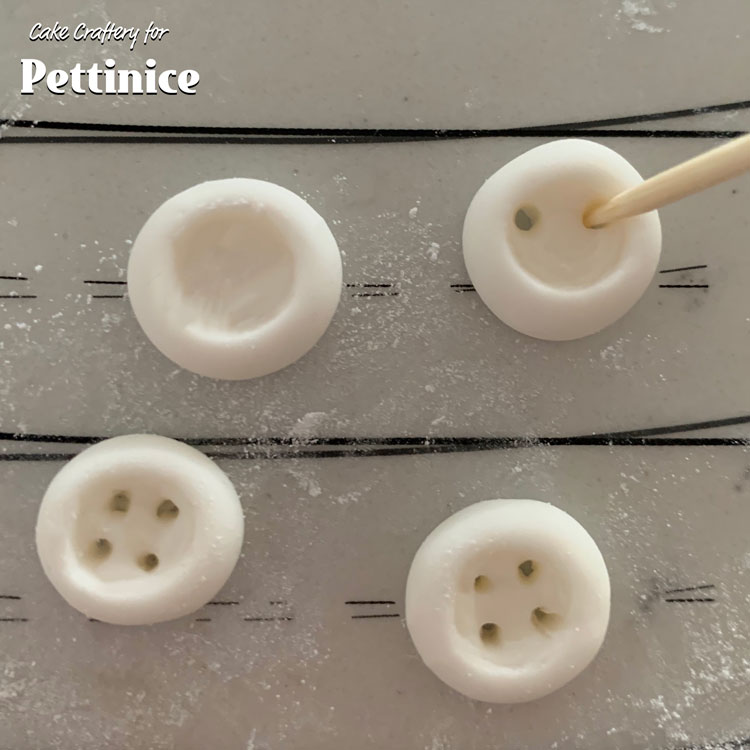
Use a cocktail stick to make 4 holes in each button. Set aside to dry a little.
How to make a fondant handkerchief for your cake
Making the fondant handkerchief and pocket
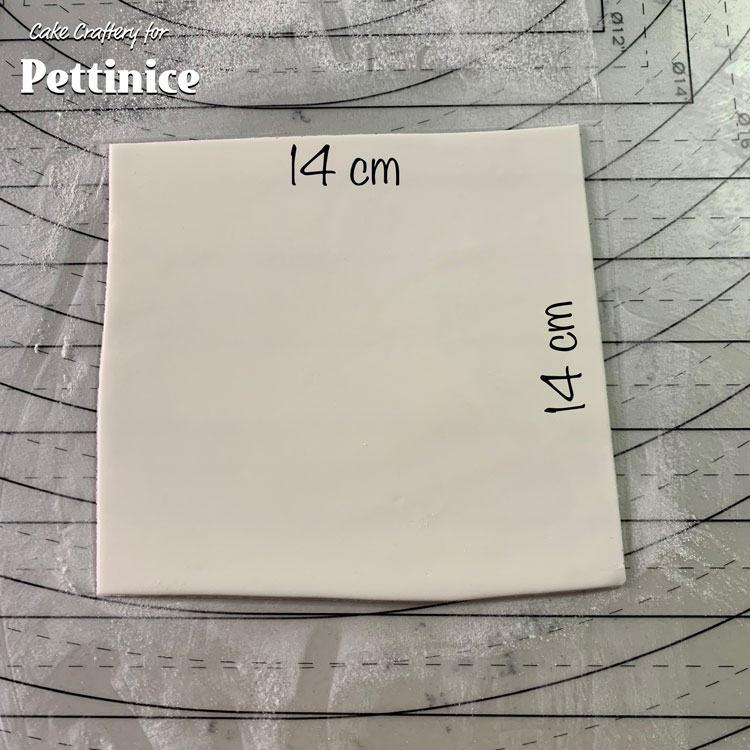
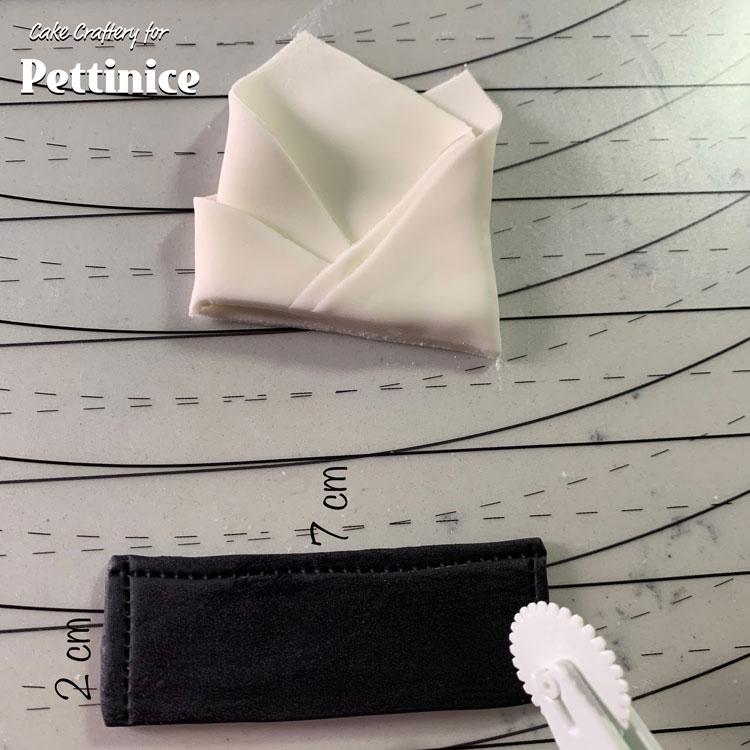
Make the pocket square. Roll thinly a 14cm x 14cm square of white fondant.
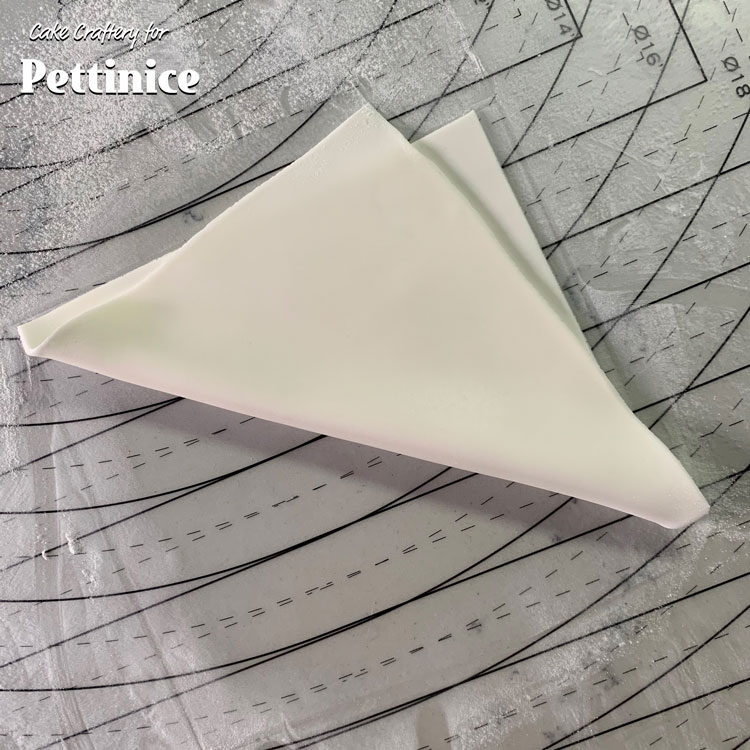
Fold diagonally but slightly off-centre to make 2 points.
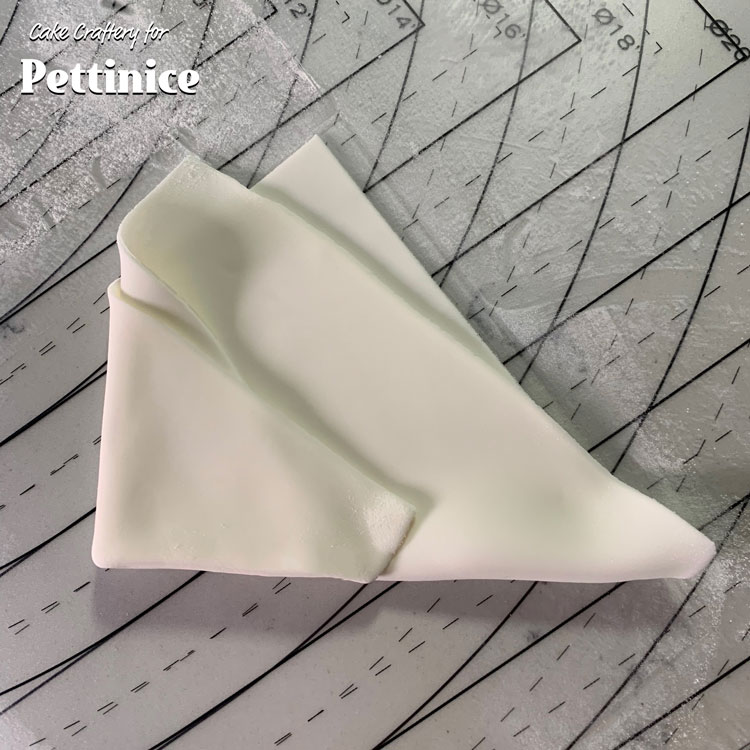
Fold the left side over, lining up the bottom folded edge as shown.

Fold the right side over the left. Dab a little water or edible glue inside the folds to hold them together.
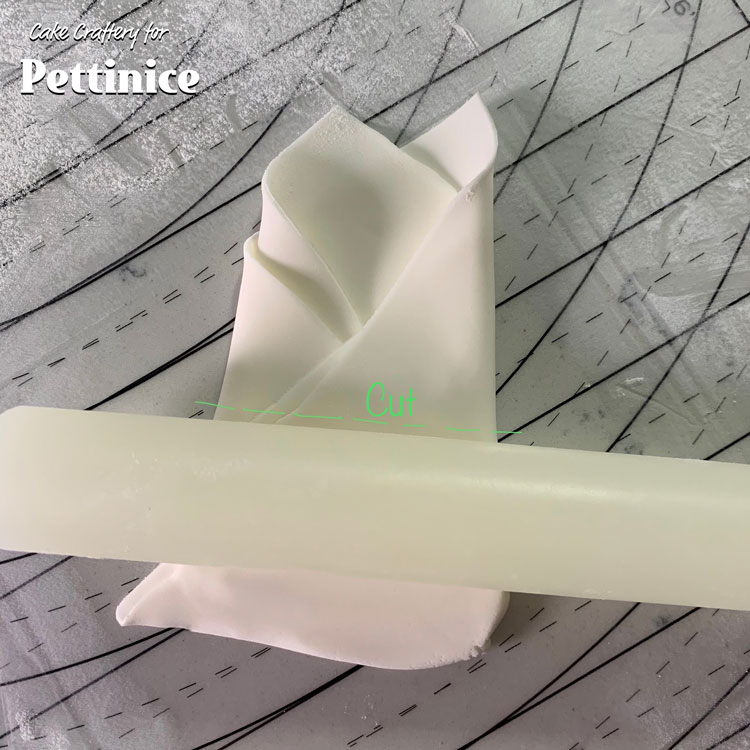
Roll the bottom half thinner and cut away the excess.
How to assemble a tuxedo suit cake
Final assembly and details for your tuxedo cake
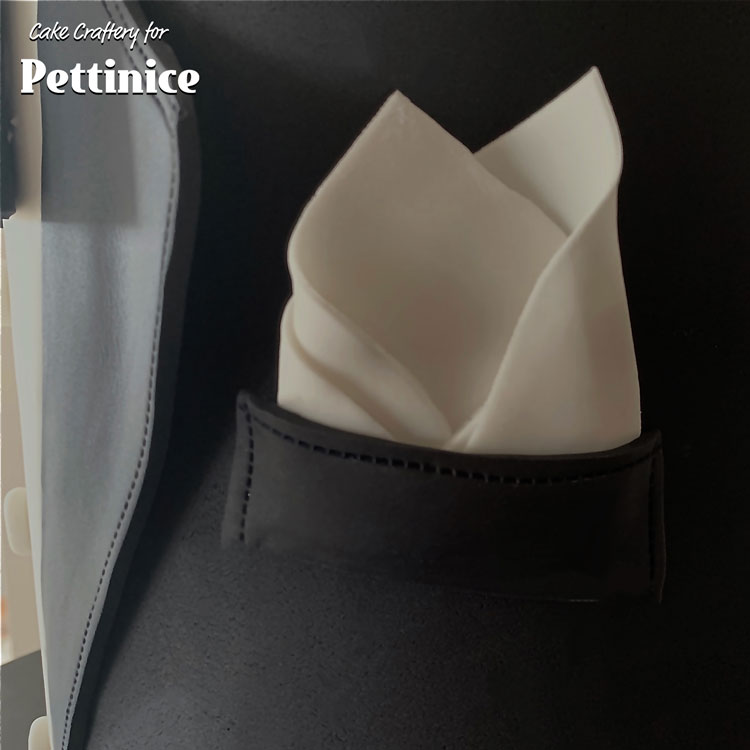
Glue the pocket square onto the cake just out from the left lapel and glue the black strip across the bottom edge of it so it looks as though the square is in the pocket.
Once the collar is dry enough to hold its shape, lift it up off the cardboard form and position onto the cake. It should be right at the edge and lined up with the shirt front. Run a little water or glue on the bottom edge of the collar to attach it to the cake. (Keep the cardboard form to use another time!)
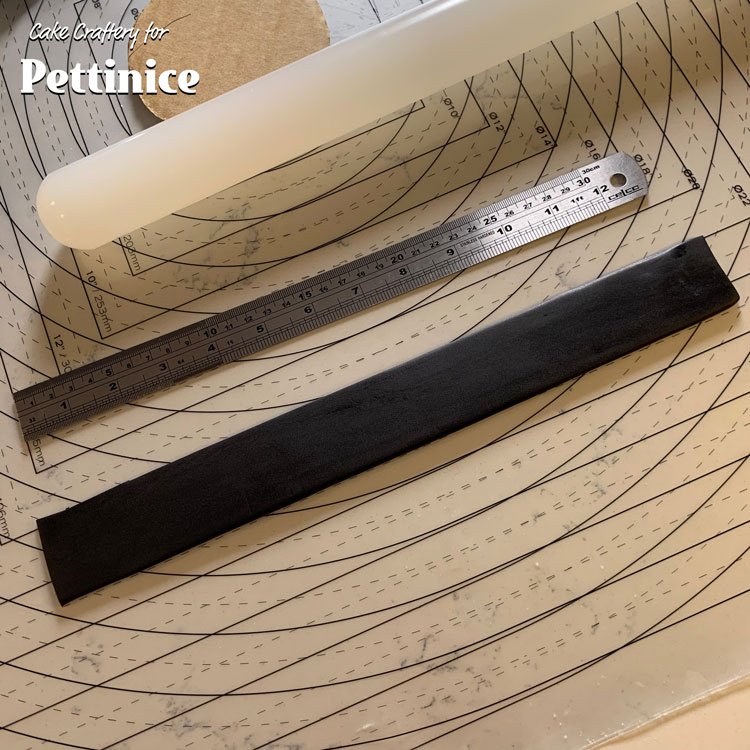
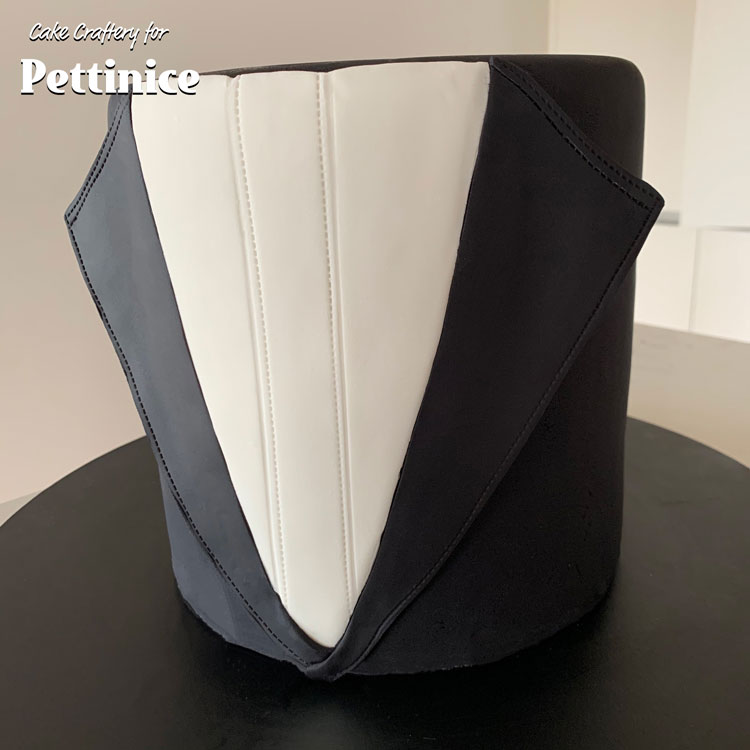
Now make the jacket collar. Start with a strip of black fondant that’s longer than you need - cut a strip that’s 3.5cm wide and about 35cm long. Make a stitch line on the top edge.
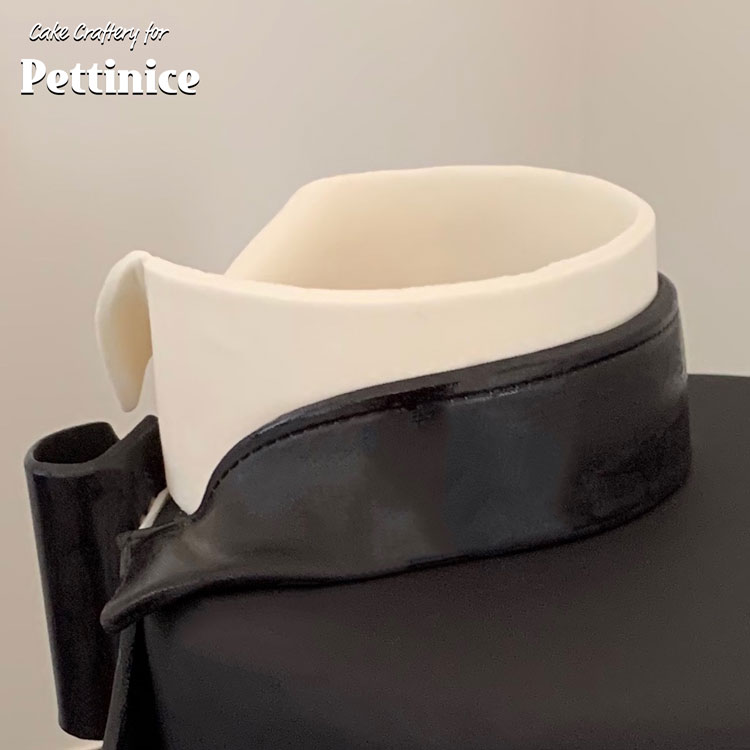
Attach this strip to the white shirt collar and the cake itself. The suit collar sits lower than the shirt collar.
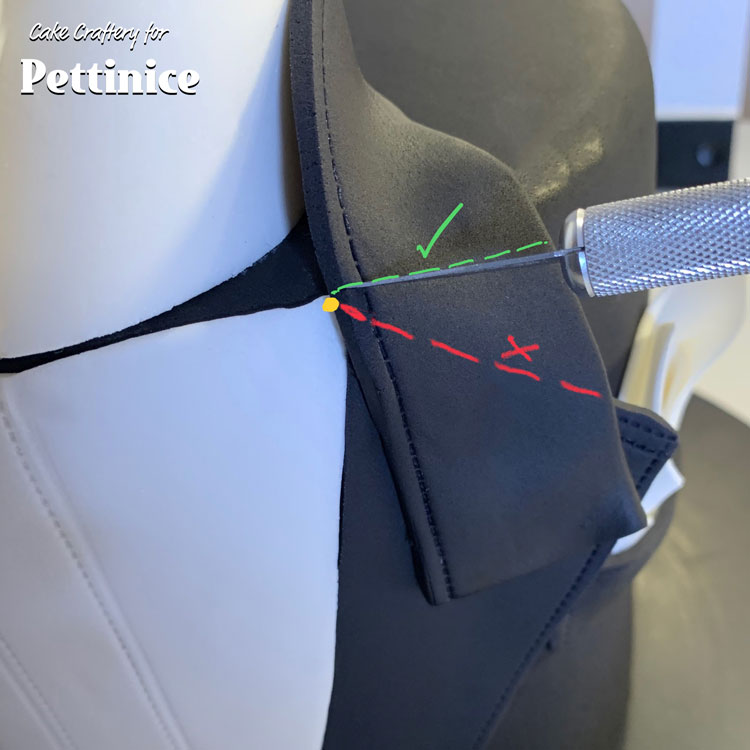
The ends of the suit collar will overlap the 2 lapels at this stage. Cut off the excess right at the point where the lapel and the shirtfront meet the top edge of the cake - the yellow dot on the diagramme. Cut at a right angle, don’t cut it to meet the top edge of the lapel. The collar and lapel should only meet at the yellow dot.
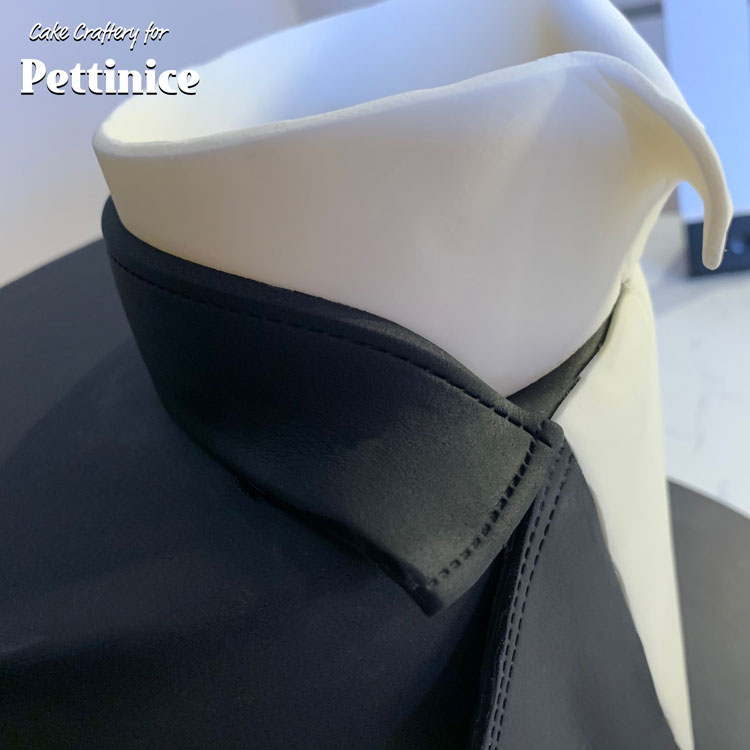
Trim both ends of the suit collar in this way and make a stitch line across trimmed end.
Once your bow has dried you can attach it to the cake at the top of the shirt front. I used 2 5cm lengths of spaghetti to anchor it to the cake as it’s fairly heavy. It’s a good idea to use a stronger ‘glue’ for the bow. I used royal icing but melted chocolate would also work, as would a little melted isomalt.
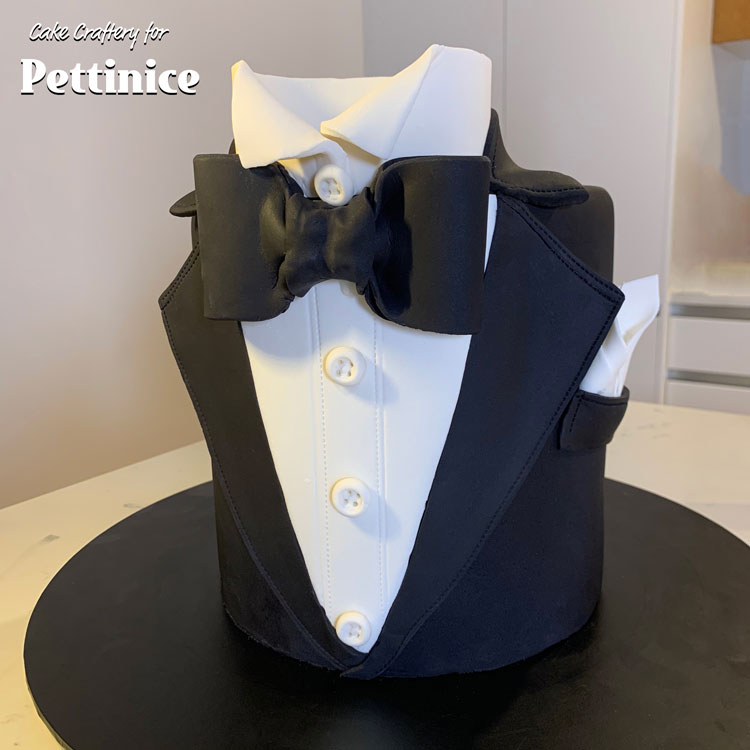
Press the bow onto the spaghetti and the ‘glue’. The spaghetti should hold it in place. Now you can attach the buttons to the centre of the shirt front with a little edible glue.
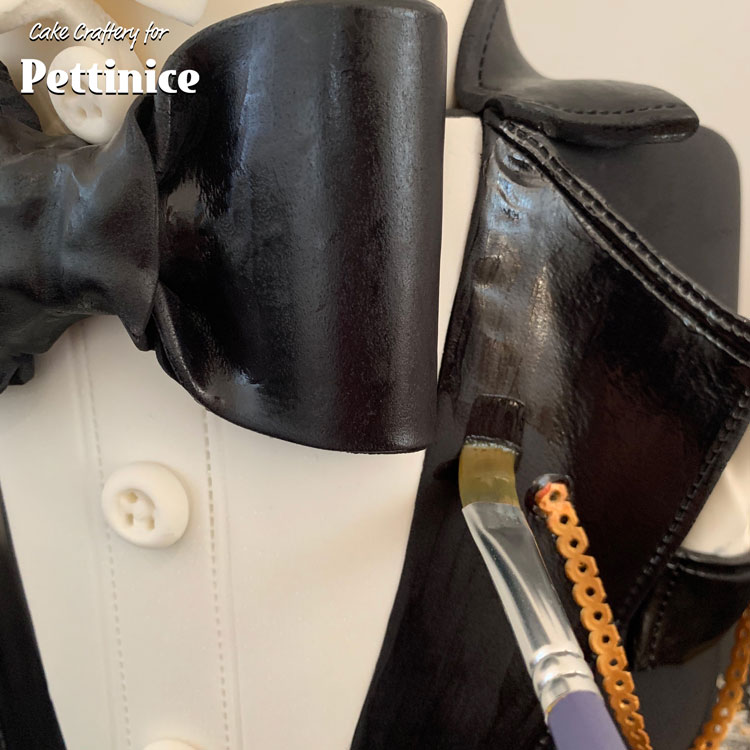
This next step is optional. If you want the effect of silk lapells, bow-tie and collar, you can paint with edible food gloss. I used a shellac gloss but you can use a very light coat of oil or alternately some thinned down glucose/corn syrup or piping gel.
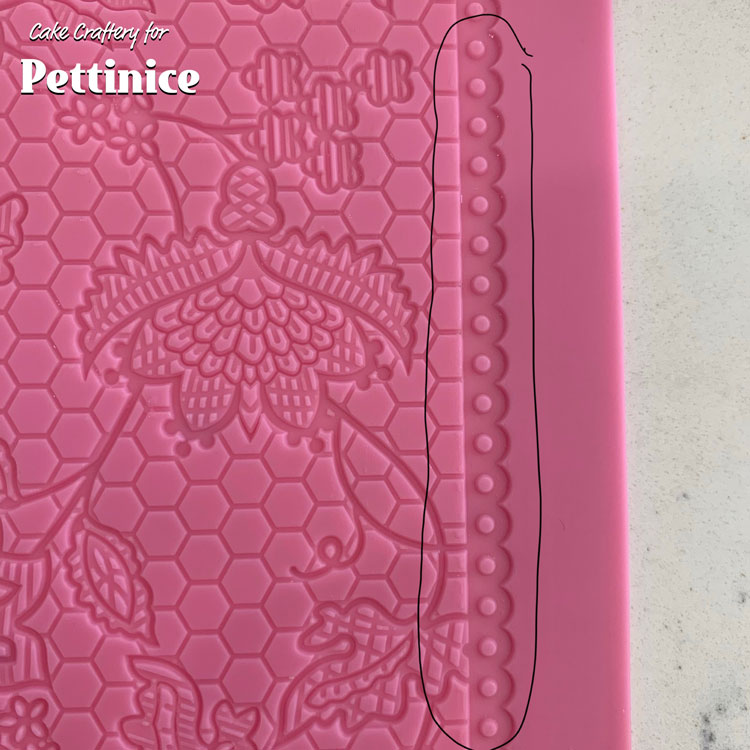
I have noticed that lapel chains have come back into fashion so I decided to finish my cake off with one, I don’t have a chain mold so I used the edge of a piece of edible cake lace for the chain, dusting it with gold lustre. A real chain would look better but I like to keep things all edible.
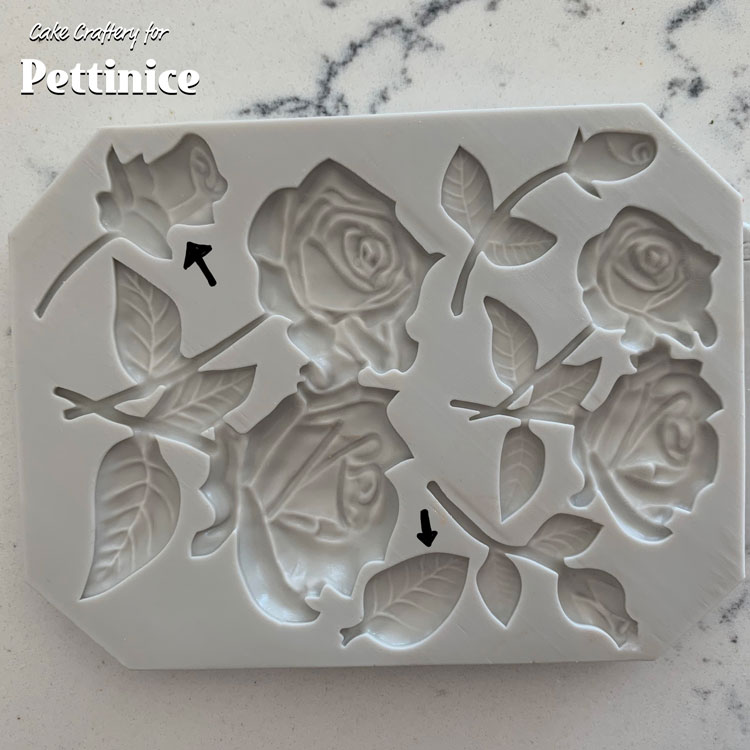
I poured a little red isomalt into this simple rose and leaf mold for the ‘brooches’. I then painted gold lustre mixed with rose spirit around the edges of the isomalt. I attached one end to the left lapel and the other end to the pocket trim with a little of the same isomalt.
I finished the board with a sprinkle mix I found at my local supermarket. It’s called “Glamour & Sparkle”. I used piping gel on the board before sprinkling the mix on.

Tracey van Lent owns The Cake Craftery in Riverhead, Auckland. Tracey’s background is in art and design and she gained a Bachelor’s Degree in Visual Communications when her four children were young. She has been decorating cakes for many years and has taught classes in her local community in North-West Auckland in more recent years.
She loves working with Pettinice in every aspect of her fondant work and particularly likes the unlimited palette of colours that can be produced by just mixing together the colour range.
See more of Tracey's cakes at